3D printing infill patterns are the internal lattices a slicer draws inside a part, and the choice matters less than most people expect. For everyday prints, grid or cubic at 10–15% density is enough; gyroid suits flexible and all-direction parts, lightning uses the least plastic, and extra walls add more strength than extra infill.
Infill sits next to walls, top layers and speed in every slicer; our guide to 3D printing slicer settings covers those. Below you will find a pattern comparison table, density guidance by use, the honest answer on the strongest pattern and where to change infill in four slicers.
The short answer
| Your goal | Pattern | Density |
|---|---|---|
| Everyday parts, quick slicing | Grid or cubic | 10–15% |
| Large parts, save plastic | Adaptive cubic | 10–15% |
| Decorative models, fastest print | Lightning | Low, top surfaces only |
| Flexible filament or loads from all directions | Gyroid | 10–20% |
| Parts that get squeezed or clamped | Cubic, gyroid or grid, plus more walls | 30–50% |
| Transparent or round flexible parts | Concentric | As needed |
Density values follow Prusa and Bambu Studio’s profiles for everyday parts and UltiMaker’s guide for gyroid and loaded parts.
What is infill in 3D printing?
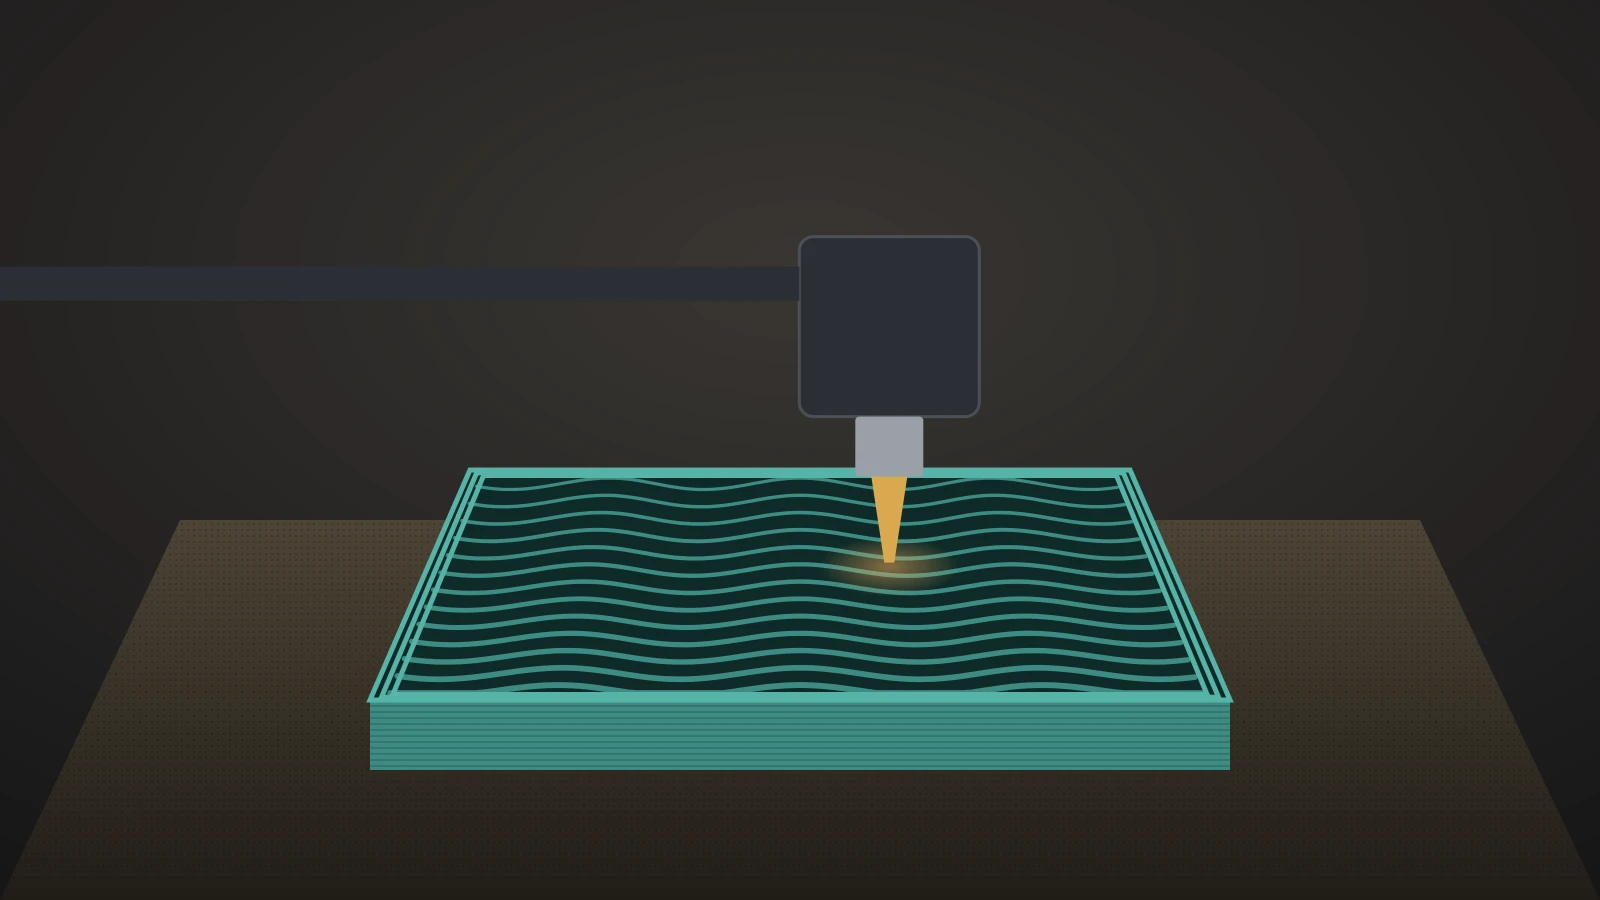
Infill is the internal structure a slicer prints inside a part’s walls so the part does not have to be solid. It holds up the top layers, gives the part stiffness and resistance to crushing, and saves plastic and time compared with printing it solid.
Two settings control it. Density is the share of the interior that gets filled, with 100% meaning solid. Pattern is the shape of the lattice: lines, grids, triangles, cubes or curved surfaces. OrcaSlicer’s wiki notes that density usually refers to the infill volume, not the whole part, and that not every pattern turns the same percentage into the same amount of plastic.
Slicers also print solid infill, the fully filled layers directly under top and above bottom surfaces. This guide is about the sparse infill in between.
3D print infill density: how much do you need?
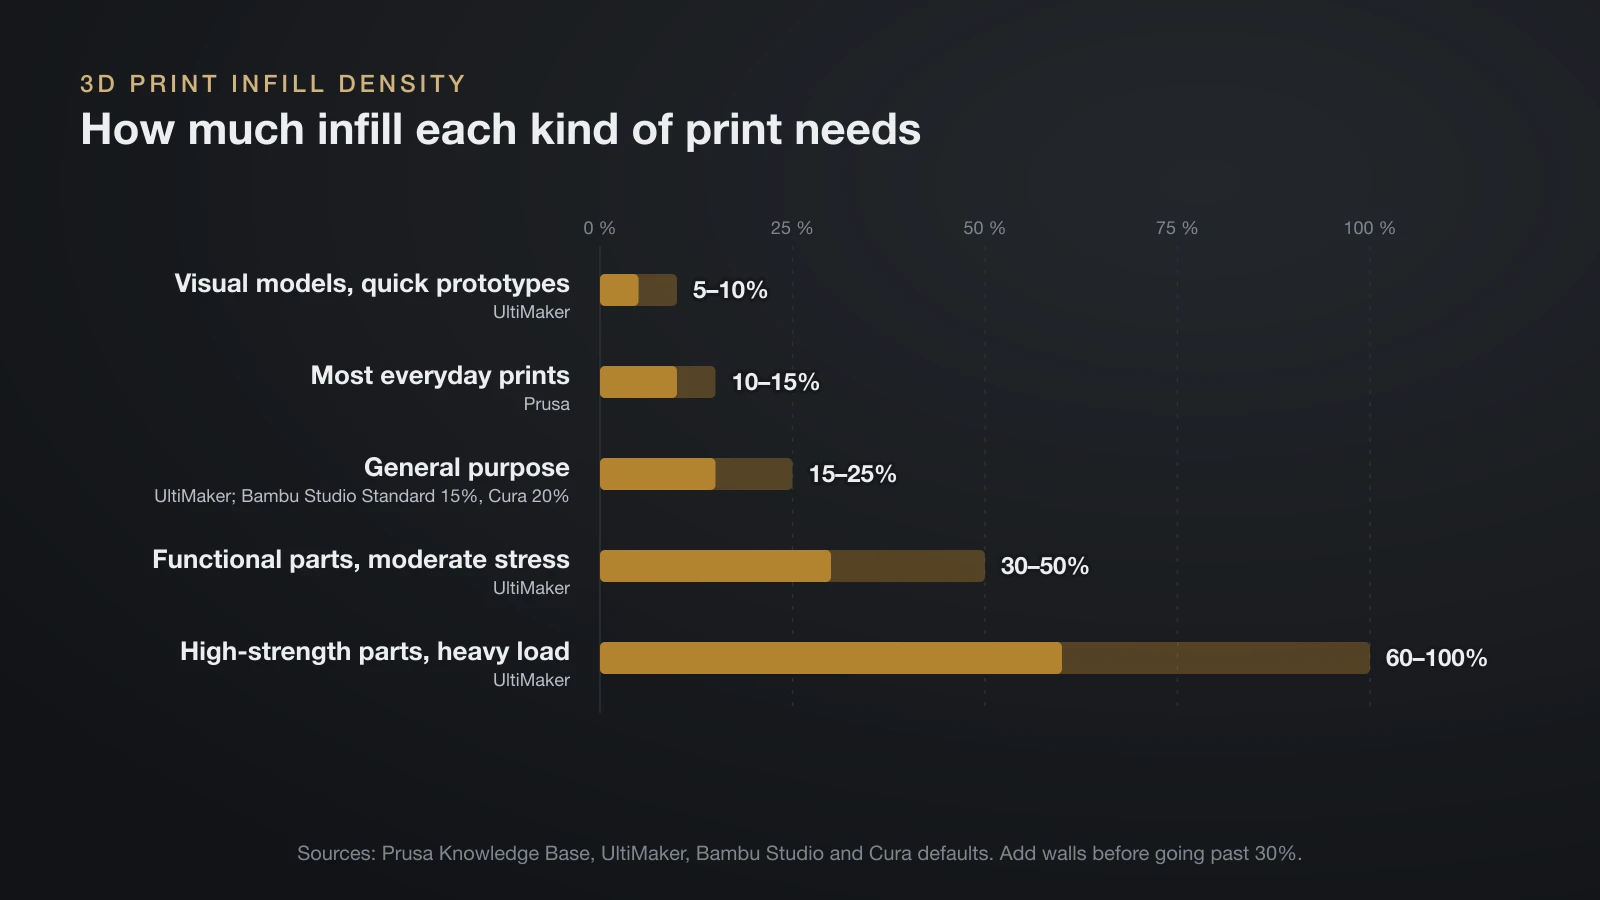
Most 3D prints need only 10–20% infill density, and only parts under real load need more. Prusa’s Knowledge Base says most models print fine at 10–15% and that you will rarely need more than 30%. Bambu Studio’s Standard profile uses 15% and Cura’s default is 20%.
| Use | Density | Source |
|---|---|---|
| Visual models, quick prototypes | 5–10% | UltiMaker |
| Most everyday prints | 10–15% | Prusa |
| General purpose | 15–25% | UltiMaker; Bambu Studio Standard 15%, Cura 20% |
| Functional parts under moderate stress | 30–50% | UltiMaker |
| High-strength parts under heavy load | 60–100% | UltiMaker |
Higher density raises strength, weight, filament use and print time together. Before you climb past 30%, add walls: the next sections explain why that usually pays off better.
3D printing infill patterns compared
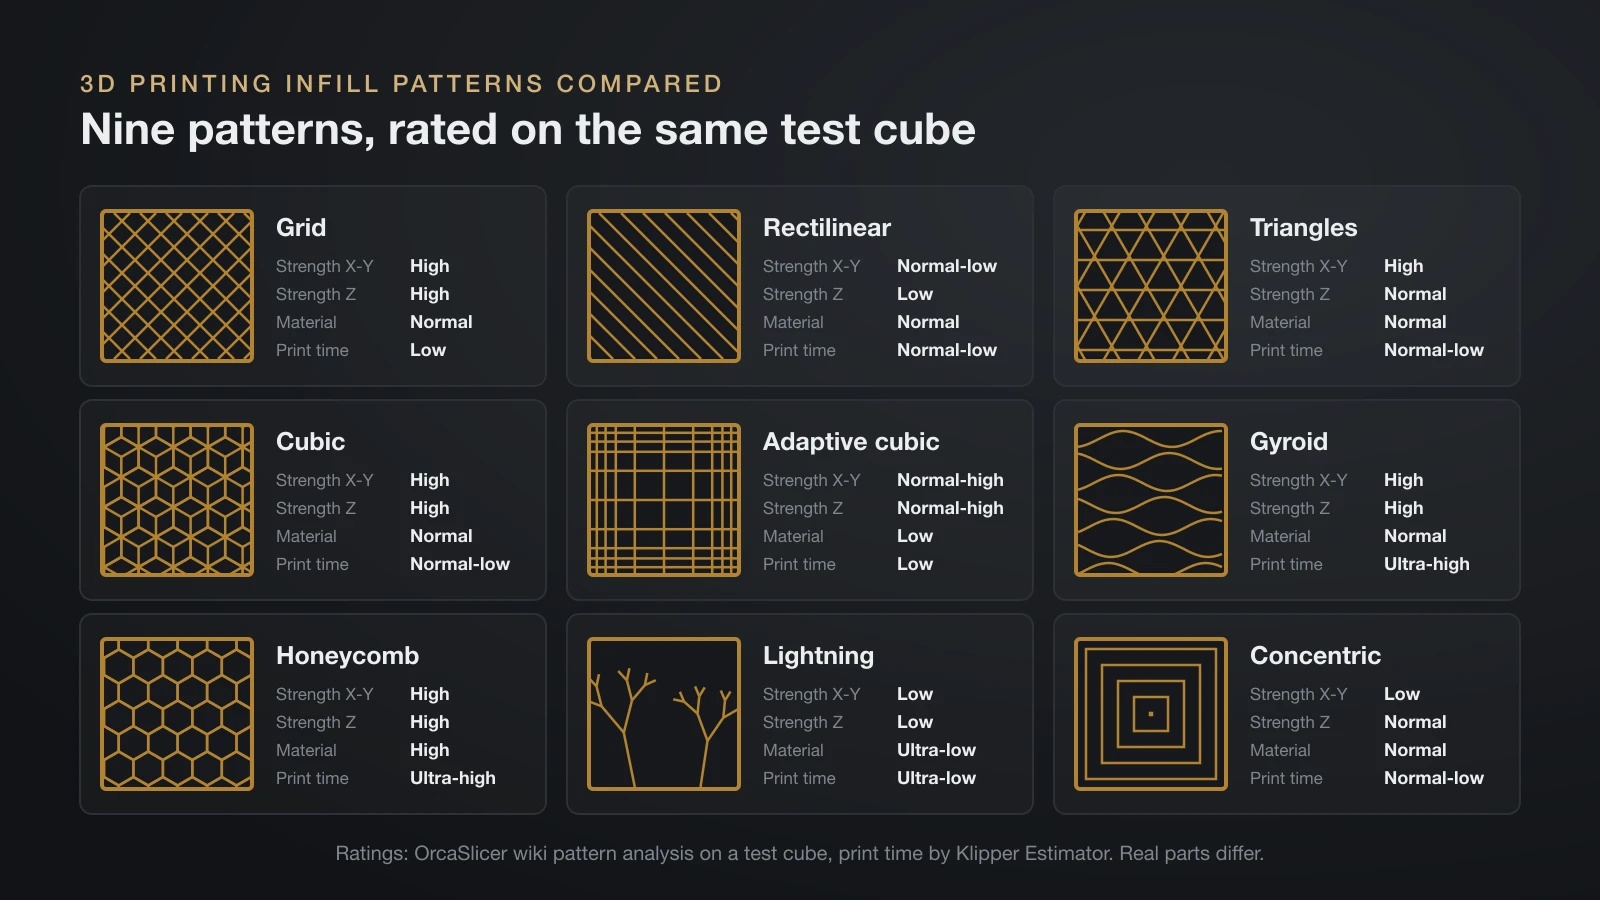
The main 3D printing infill patterns differ in how strong they are in each direction, how much plastic they use and how long they take. OrcaSlicer’s wiki rates them on the same test cube, with print times estimated by Klipper Estimator:
| Pattern | Strength X-Y | Strength Z | Material | Print time | Good for |
|---|---|---|---|---|---|
| Grid | High | High | Normal | Low | Everyday parts |
| Rectilinear | Normal-low | Low | Normal | Normal-low | Quick, light-duty prints |
| Triangles | High | Normal | Normal | Normal-low | Side loads, shear |
| Cubic | High | High | Normal | Normal-low | Loads from all directions |
| Adaptive cubic | Normal-high | Normal-high | Low | Low | Large parts |
| Gyroid | High | High | Normal | Ultra-high | Flexible parts, even strength |
| Honeycomb | High | High | High | Ultra-high | Stiff parts, when time does not matter |
| Lightning | Low | Low | Ultra-low | Ultra-low | Decorative models |
| Concentric | Low | Normal | Normal | Normal-low | Transparent and flexible parts |
These ratings are relative, and Orca says real models will differ from its cube. The pattern also shapes how the part looks through translucent plastic and how evenly layer times run, which matters on tall, thin prints.
Pattern notes from the slicer makers
- Grid crosses itself in every layer. Prusa and Bambu Lab both call it one of the simplest and fastest patterns, but material builds up where lines cross, which can make the nozzle knock against it at high speed.
- Rectilinear prints one direction per layer, so nothing crosses; Prusa calls it one of the fastest to print.
- Cubic stacks tilted cubes. Prusa and Bambu Lab note its air pockets help insulate and can even help a waterproof part float.
- Adaptive cubic gets denser near walls and sparser in the middle; Prusa puts its material use at about a quarter less than rectilinear.
- Honeycomb never crosses itself, but Prusa says it uses about 25% more material and can take up to twice as long as rectilinear.
What is the strongest infill pattern?
No single infill pattern is the strongest, because the answer changes with the direction of the load. OrcaSlicer rates grid, cubic, gyroid and honeycomb high in both the horizontal and vertical directions, while Bambu Lab calls tri-hexagon one of the strongest patterns under tension.
Lab studies point the same way. In a 2023 Heliyon study on ABS, concentric infill at 80% density and 0.1 mm layers reached 38.95 MPa in tensile tests, 123% and 115% above line and triangle patterns. A 2022 study in Materials on PLA found hexagonal (honeycomb) infill strongest of the five lattices it compared, including gyroid. Each result holds for its own test bar, density and load direction.
For a real part, match the pattern to the load: cubic or gyroid when force can come from any side, triangles or grid for side loads. Then spend your plastic on walls.
Walls vs infill: which adds more strength?
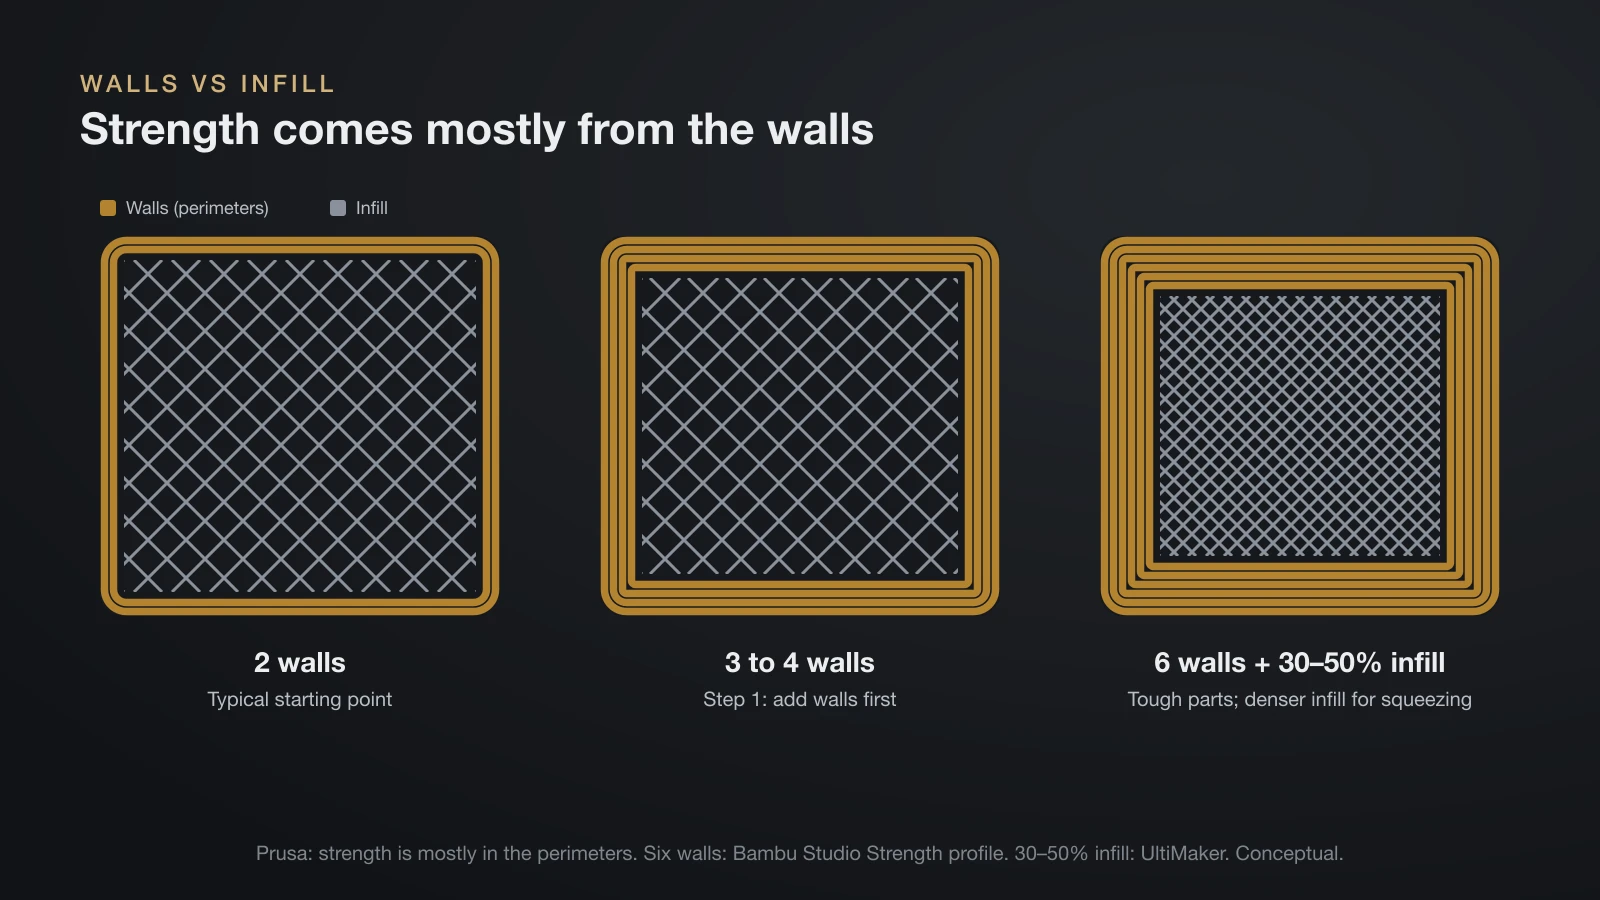
Walls add more strength than infill for most parts, because bending and impact loads concentrate in the outer skin. Prusa states it directly: a model’s strength is mostly defined by the number of perimeters, not by the infill, which mainly helps with compression.
A practical order for a part that must be stronger:
- Add walls first: go from two to three or four, or six for really tough parts, as Bambu Studio’s Strength profile does.
- Then raise density to 30–50% if the part gets squeezed or clamped.
- Pick a pattern that matches the load from the table above.
- Orient the part so loads run along the layers, not across them. Layer bonds are the weak point, as our guide to 3D printed joints shows with clips and hinges.
Layer height interacts with infill too: PrusaSlicer can combine infill into thicker layers every few layers while keeping thin walls, which saves time. The wider trade-offs are in our guide to 3D printing layer height.
Is 100% infill the strongest?
A 100% infill part is the most solid and resists crushing best, but it is rarely the best use of time and plastic. Prusa says you will rarely need more than 30% and that 100% infill can spoil the look of the part; PrusaSlicer also switches the pattern to rectilinear at 100%.
Bambu Studio allows 100% density only with certain patterns: concentric, rectilinear, aligned rectilinear, Hilbert curve, Archimedean chords and octagram spiral. For most functional parts, more walls plus 30–50% infill get close to solid behavior for far less filament.
Fastest infill pattern and the one that uses the least filament
Lightning is both the fastest infill pattern and the one that uses the least filament, but it is for looks, not strength. It grows tree-like branches only under the top surfaces, and Bambu Lab applies the set density only to the layer directly below the top.
| Need | Pattern | Why |
|---|---|---|
| Least filament, fastest | Lightning | Branches only where the top surface needs holding up |
| Very little filament | Support cubic | Gets denser only toward the top layers; Prusa says lightning saves even more |
| Saving on large functional parts | Adaptive cubic | About a quarter less material than rectilinear (Prusa) |
| Fast and still useful | Grid or rectilinear | Simple straight paths |
Lightning infill works like internal support for the roof of the part. Overhangs on the outside still need real 3D printing supports.
Gyroid infill: what it is good for
Gyroid infill is a wavy, three-dimensional surface that gives nearly equal strength in every direction and never crosses itself within a layer. Prusa calls it its favorite pattern, with a good strength-to-weight ratio, and Bambu Lab adds that the lack of crossings lets it print relatively fast.
- Flexible filament: OrcaSlicer calls gyroid excellent for strong, flexible prints; see our TPU filament guide for the other settings.
- Less warping: with no long straight lines, Orca says the plastic’s shrinkage spreads along the curves.
- Filling with resin or liquid: the connected cells let it flow through, as Prusa and Orca both note.
The costs are longer slicing, bigger G-code files and, per Bambu Lab, strong vibration at high density and speed. Orca’s own time estimates rank gyroid among the slowest patterns, so test it on your printer if time matters.
How to change infill in Bambu Studio, OrcaSlicer and PrusaSlicer
Every slicer puts infill density and pattern in the same group of process settings, usually named Strength or Infill.
| Slicer | Where to find it | Setting names |
|---|---|---|
| Bambu Studio | Process, Strength tab | Sparse infill density, Sparse infill pattern |
| OrcaSlicer | Process, Strength tab, Infill | Sparse infill density, Sparse infill pattern |
| PrusaSlicer | Print Settings, Infill | Fill density, Fill pattern |
| UltiMaker Cura | Print settings, Infill | Infill Density, Infill Pattern |
Change infill for only part of a model
In Bambu Studio, right-click the model, choose Add modifier, drag the shape over the area, then type a new value in Sparse infill density; a Height range modifier does the same for a band of layers. OrcaSlicer works the same way. Cura’s Gradual Infill Steps halves the density step by step away from top surfaces.
A dense modifier around a screw hole is often better than raising density everywhere. For holes that must fit hardware, our guide to 3D printing tolerances covers the clearances.
The bottom line
Use 10–15% grid or cubic for everyday prints, adaptive cubic for big parts, gyroid for flexible filament and lightning for display pieces. When a part needs to be stronger, add walls before you raise infill above about 30%, and match the pattern to the direction of the load. Change density locally with a modifier instead of filling the whole part.
Sources
- OrcaSlicer Wiki: Infill, Patterns and Patterns quick reference (density definition, strength, material and time ratings by pattern, gyroid notes)
- Prusa Knowledge Base: Infill and Infill patterns (10–15% for most models, rarely above 30%, perimeters vs infill, 100% forces rectilinear, adaptive cubic about 1/4 less material, honeycomb about 25% more material and up to twice the time, lightning, gyroid)
- Bambu Lab Wiki: Fill patterns and Modifiers (pattern behavior, 100% density patterns, lightning density rule, setting path, modifiers); Bambu Studio process profiles (Standard 15%, Strength six walls)
- UltiMaker: Infill patterns guide (density bands by use, flexible parts) and Cura setting definitions (20% default density, Gradual Infill Steps)
- Peer-reviewed studies: Agrawal et al., Heliyon 2023 (ABS, concentric 38.95 MPa, 123% and 115% above line and triangle) and Ganeshkumar et al., Materials 2022 (PLA, hexagonal infill strongest of five lattices)