A 3D scanner for 3D printer projects captures the shape of a real object as a 3D mesh, which you clean up, export as a watertight STL file and slice like any other model. Consumer structured-light and laser scanners list accuracy from about 0.1 mm down to 0.02 mm, while free phone photogrammetry trades precision for zero cost.
Scanning is the shortcut for shapes that are hard to measure: sculptures, faces, curved trim and worn parts. It does not replace design work, though; most scans become a reference you model over, as in our guide on how to make 3D models for printing. Below are the scanner types, what their spec sheets mean and the full scan-to-print workflow.
The short answer
| Scanner type | Example spec (manufacturer) | Best for |
|---|---|---|
| Desktop structured light with turntable | EinScan SE V2: accuracy 0.1 mm or better, 290–480 mm working distance | Small objects on a desk, repeatable scans |
| Handheld infrared structured light | Revopoint POP 3: 0.1 mm single-frame accuracy, 150–400 mm working distance | Medium objects, people, portable use |
| Handheld blue laser line + infrared | Creality RaptorX: 0.02 mm + 0.06 mm/m volumetric accuracy, objects 5–4,000 mm | Precise parts, dark or metal surfaces |
| Photogrammetry (photos + software) | RealityScan: free under $1 million annual revenue | Large objects, statues, low budget |
| Phone with LiDAR | iPad Pro LiDAR range up to 5 m | Rooms and big shapes, not fine detail |
How does a 3D scanner work?
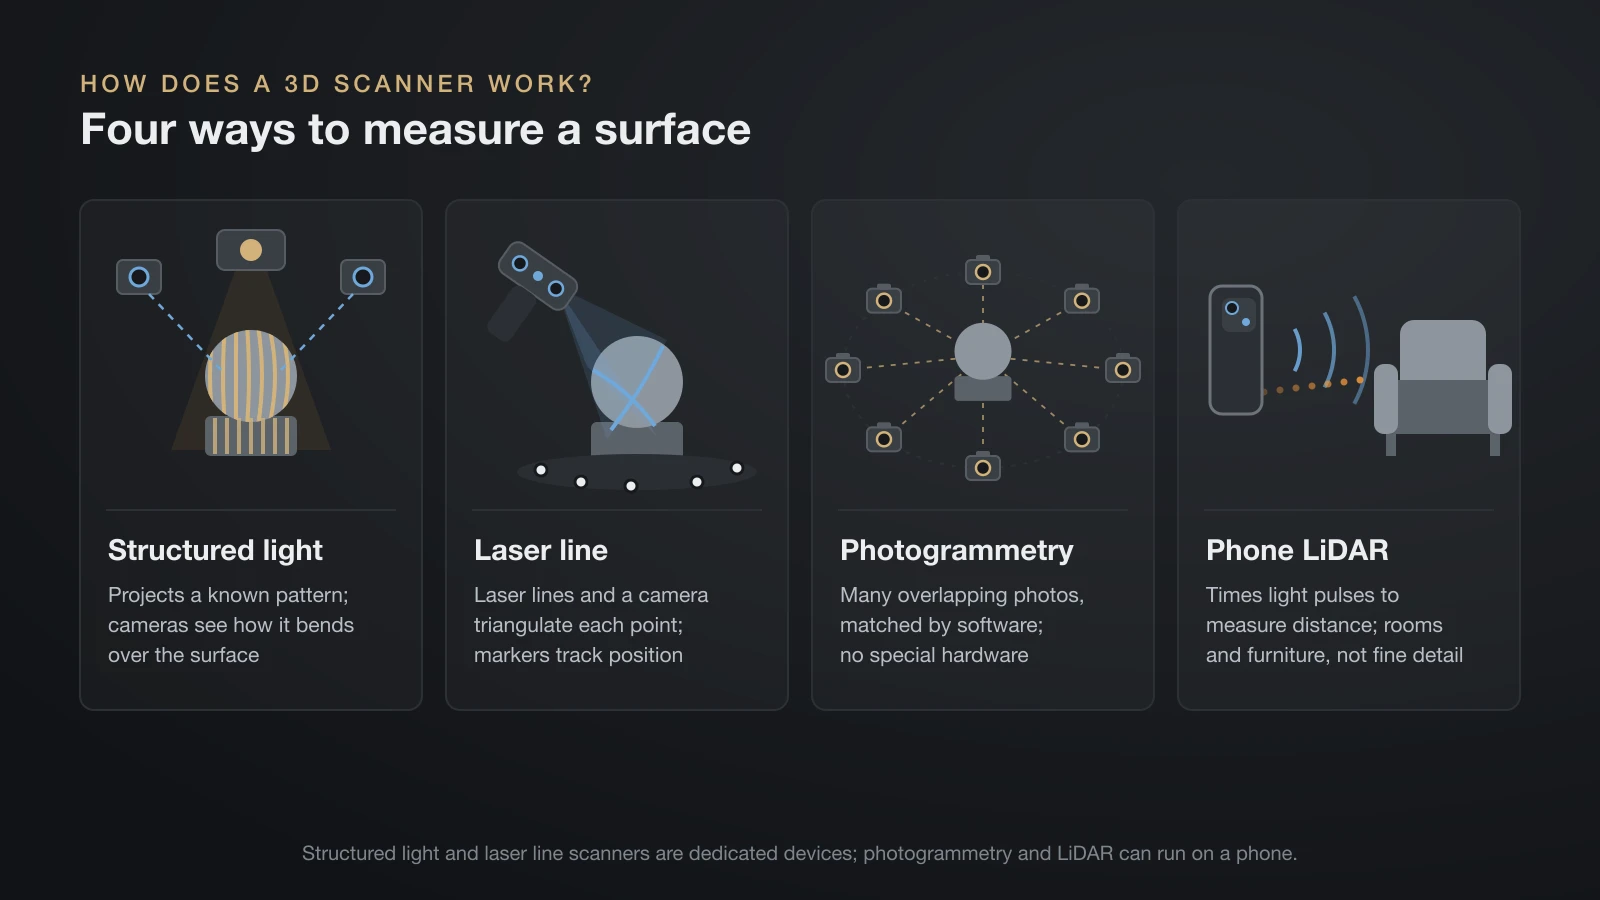
A 3D scanner measures many points on an object’s surface and joins them into a mesh, but each technology measures those points differently. The method decides how fine the detail is, how the scanner copes with dark or shiny surfaces and how large an object it can handle.
Structured light scanners
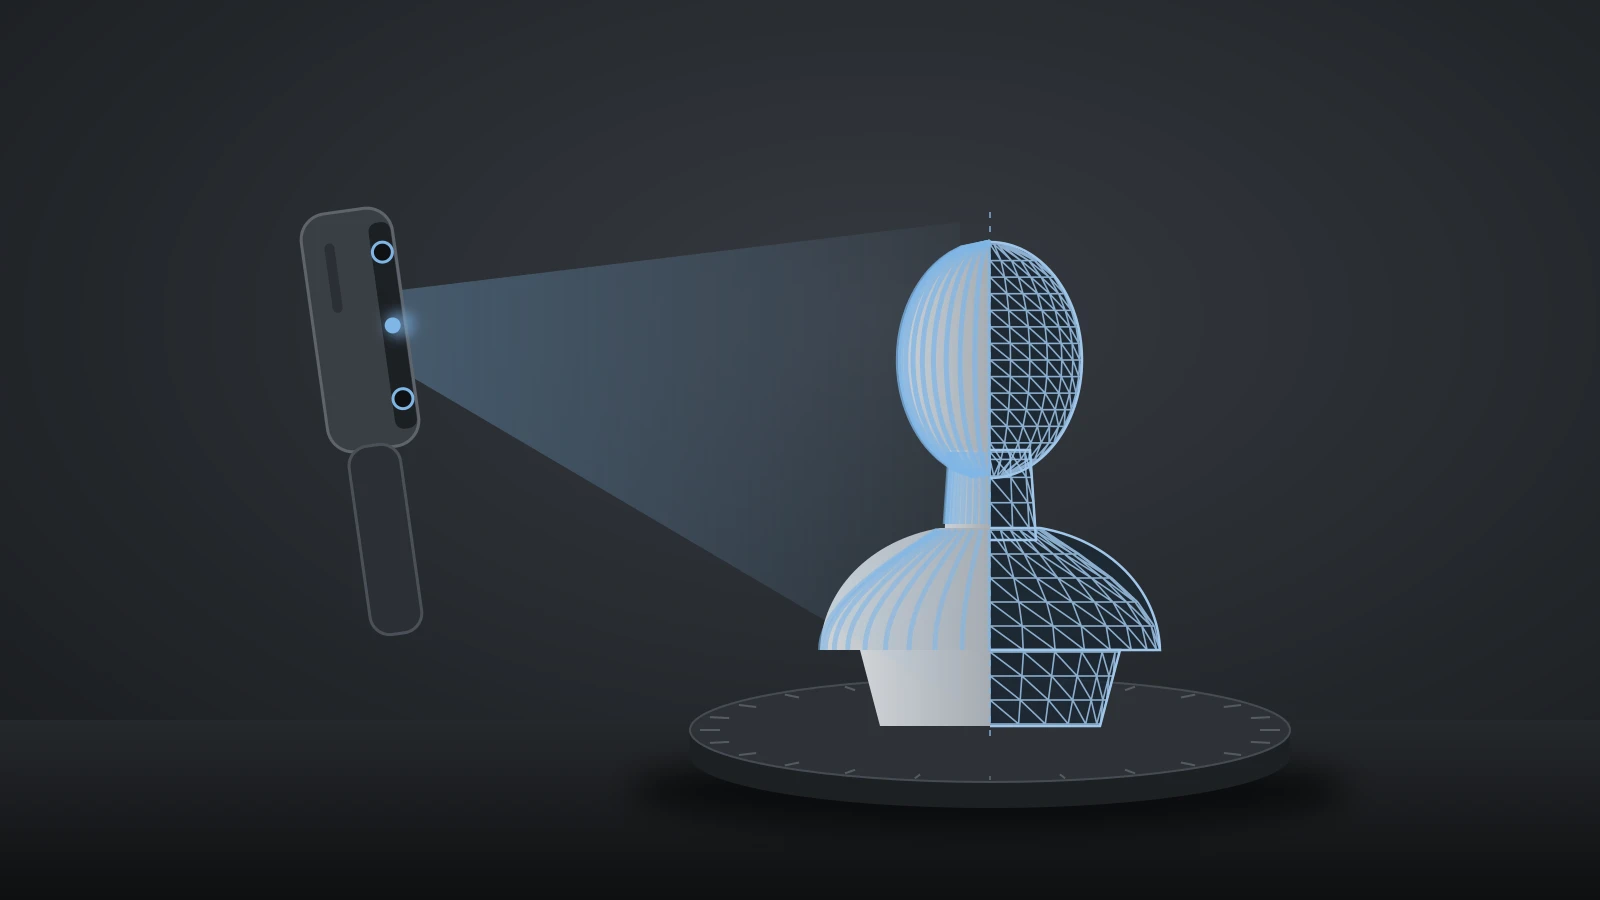
Structured light scanners project a known pattern onto the object and use cameras to see how the pattern bends over its surface. The EinScan SE V2 uses white LED light and takes a single shot in under 1 second, or under 45 seconds for a full turntable rotation. The Revopoint POP 3 uses dual-camera infrared structured light and can scan handheld or on a desktop stand.
Laser line scanners (3D laser scanners)
A 3D laser scanner sweeps one or more laser lines across the surface and triangulates each point from the line’s position in the camera image. Creality’s RaptorX combines 34 crossed blue laser lines and 7 parallel lines with an infrared mode. Laser scanning often relies on small reflective markers stuck on or around the object so the scanner can track its position; the RaptorX supports marker scanning.
Photogrammetry
Photogrammetry rebuilds a model from many overlapping photos taken all around the object, with software matching features between images. It needs no special hardware, scales from small figures to buildings, and depends heavily on lighting and surface texture.
Phone LiDAR
LiDAR sensors on Pro iPhones and iPads time light pulses to measure distance. Apple describes the iPad Pro sensor as measuring surrounding objects up to 5 meters away, which makes it suited to rooms and furniture rather than small parts with fine detail.
3D scanner accuracy, resolution and working distance
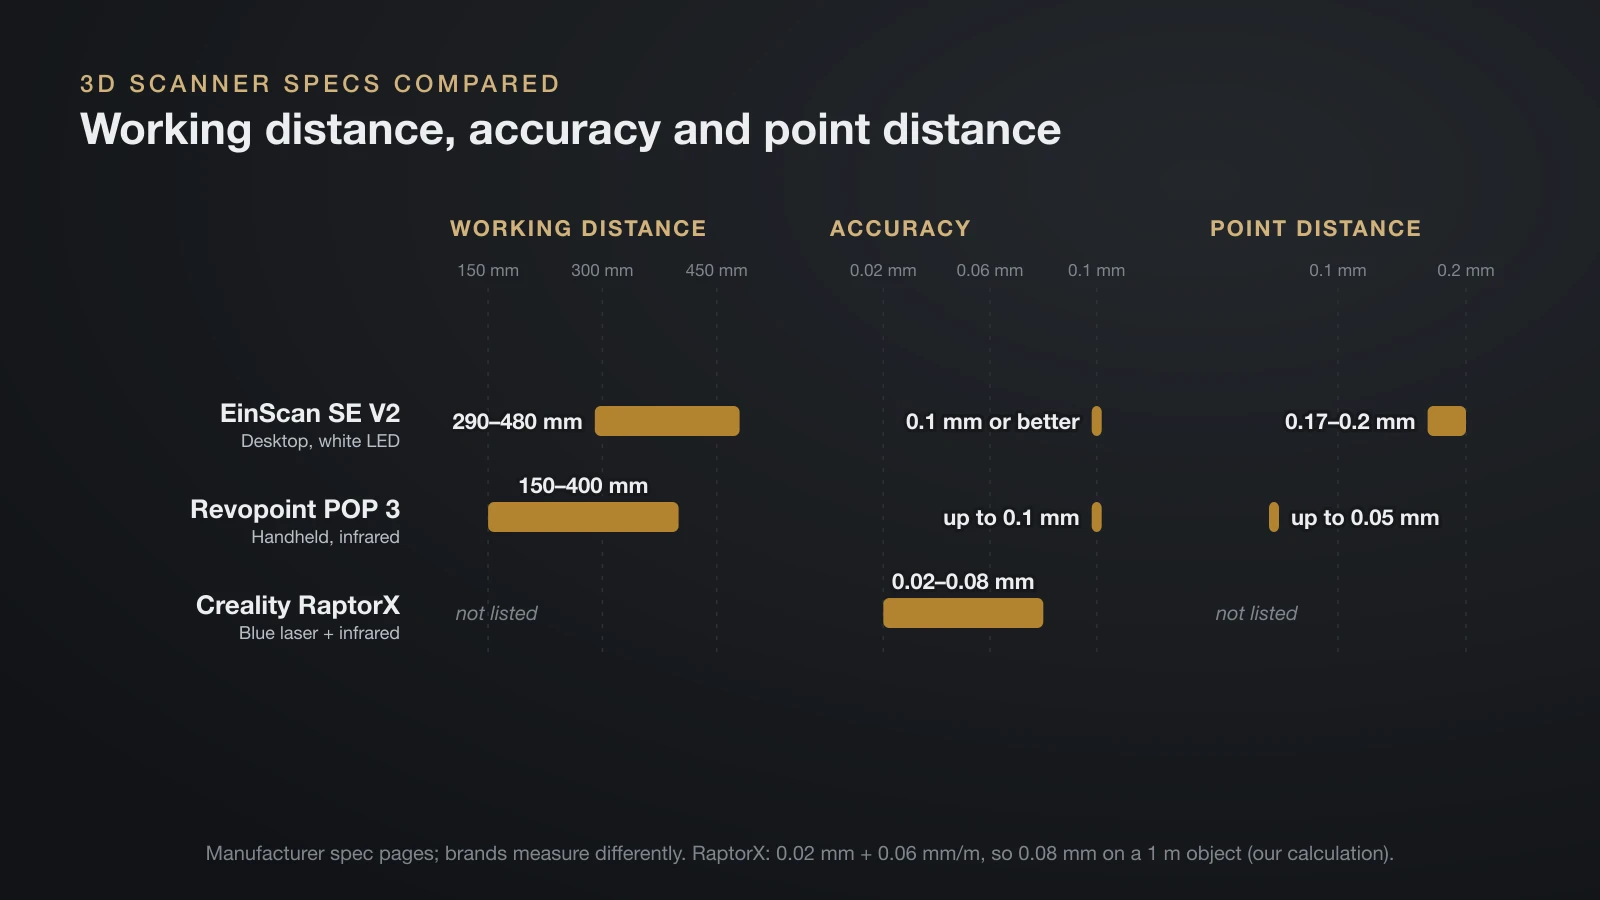
Three numbers on a 3D scanner spec sheet matter most for printing: accuracy, point distance and working distance. Manufacturers do not all measure them the same way, so compare scanners from one brand’s pages carefully and read the label next to each figure.
| Spec | What it means | Example values |
|---|---|---|
| Accuracy | How close measured points are to the true surface | EinScan SE V2: 0.1 mm or better (single shot); POP 3: up to 0.1 mm (single frame) |
| Volumetric accuracy | Accuracy over the whole object, growing with size | RaptorX: 0.02 mm + 0.06 mm/m |
| Precision | How consistently repeated measurements agree | POP 3: up to 0.05 mm (single frame) |
| Point distance | Spacing between captured points, the detail resolution | EinScan SE V2: 0.17–0.2 mm; POP 3: up to 0.05 mm fused |
| Working distance | Range between scanner and object for a valid scan | EinScan SE V2: 290–480 mm; POP 3: 150–400 mm |
| Scan volume | Smallest and largest object sizes | EinScan SE V2: 30 mm cube to 700 mm cube; POP 3: 20 mm cube to 2 m cube |
Volumetric accuracy shows why big objects are harder. By our calculation from Creality’s formula, a 1 m long object scanned with the RaptorX carries an error budget of up to 0.08 mm (0.02 + 0.06 × 1), four times the 0.02 mm figure quoted for small parts.
How to choose a 3D scanner for 3D printing
The right 3D scanner for 3D printing depends on the size of what you scan, how exact the copy must be and what surfaces you deal with. Work through these points before comparing models:
- Object size: match it to the scan volume. A desktop scanner like the EinScan SE V2 handles up to 200 mm cubes on its turntable; handheld scanners handle anything from small parts to car panels.
- Accuracy needed: decorative copies and figurines tolerate small errors, while parts that must fit existing hardware need the best accuracy you can get, plus a measurement check with calipers.
- Surfaces: dark, shiny and transparent objects need scanning spray or a laser mode.
- Handheld or desktop: handheld scanners are portable and handle large objects; desktop scanners with turntables give repeatable results with less skill.
- Computer: scan processing is demanding. Revopoint lists at least an Intel i7 12th Gen with 16 GB RAM on Windows for the POP 3, and Creality asks for an Nvidia graphics card on Windows for the RaptorX.
- Output formats: make sure the software exports STL, 3MF or OBJ. The EinScan SE V2 and POP 3 both export STL, OBJ and 3MF among others.
Avoid choosing by a “best 3D scanner” headline number alone. A 0.02 mm figure means little if the scanner cannot track your object or the software struggles on your computer.
How to use a 3D scanner: from scan to print
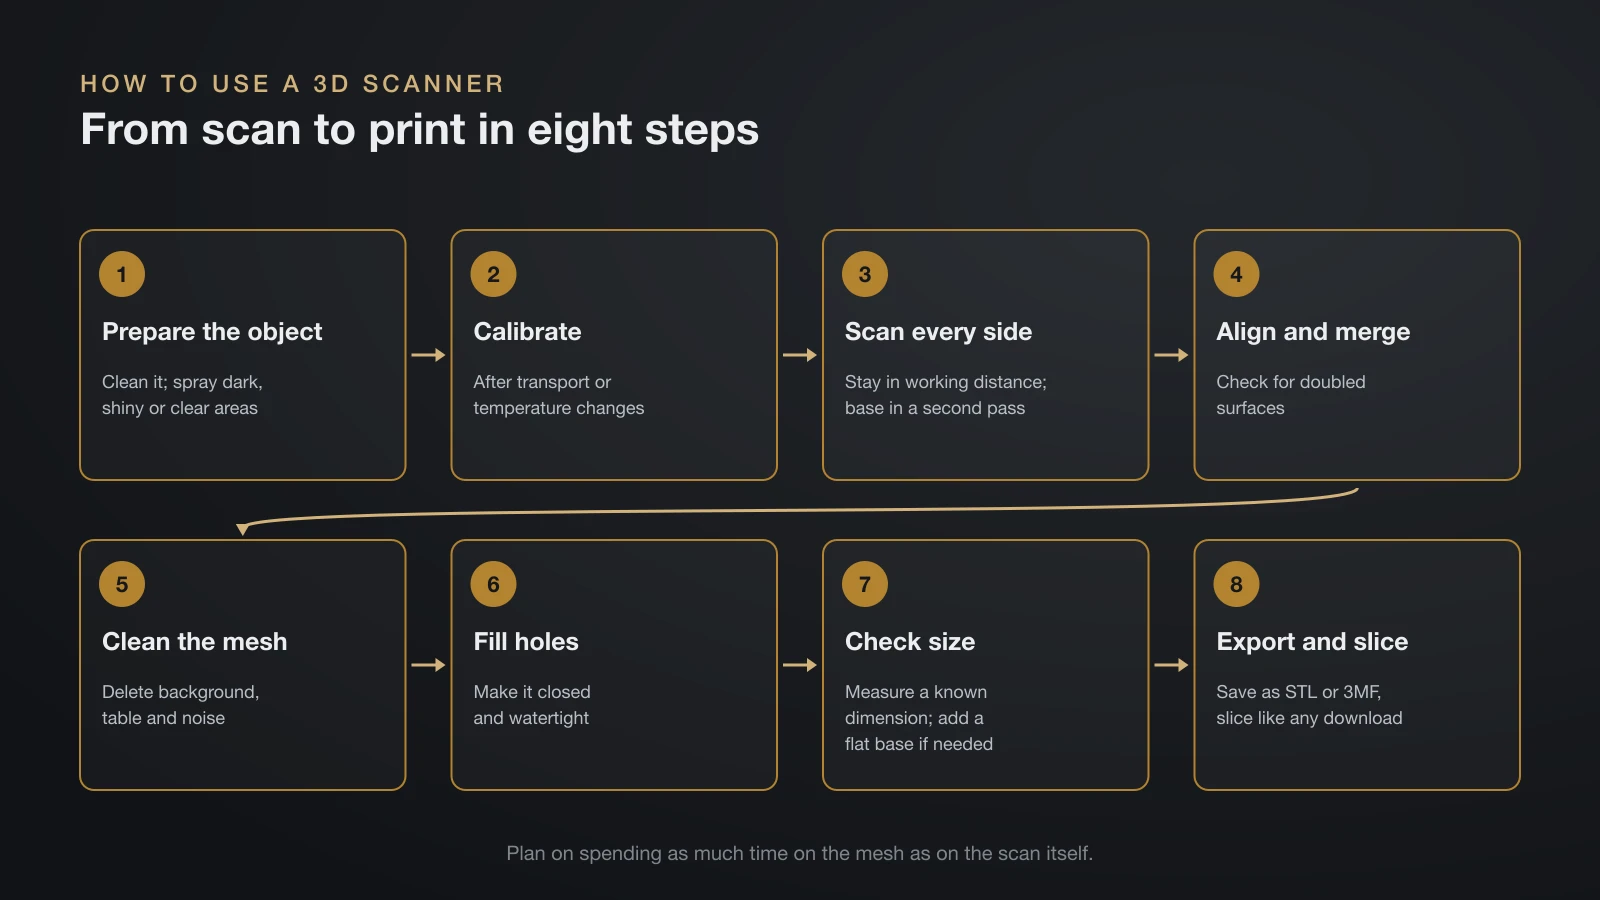
Using a 3D scanner for printing follows the same path on every device: capture, align, clean, close and slice. Plan on spending as much time on the mesh as on the scan itself.
- Prepare the object. Clean it, and apply scanning spray to dark, shiny or clear areas if your scanner needs it. Add markers if you scan in laser mode.
- Calibrate. Run the scanner’s calibration routine after transport or temperature changes.
- Scan from every side. Keep within the working distance, move slowly and capture the base in a second pass if needed.
- Align and merge. Let the software join the passes, and check for doubled surfaces where alignment slipped.
- Clean the mesh. Delete background points, the table and stray noise.
- Fill holes and make it watertight. A printable mesh must be closed, with no gaps between faces. The EinScan software, for example, can automatically produce a watertight mesh saved as STL.
- Check size and orientation. Measure a known dimension against the original, and add a flat base if the object has none.
- Export and slice. Save as STL or 3MF, then slice it like any download, as described in our STL to G-code guide.
If the mesh needs cutting, scaling or repair outside the scanner software, our guide on how to edit STL files covers the tools.
Scanning shiny, dark and transparent objects
Shiny, dark and transparent surfaces confuse most scanners because light either bounces away, gets absorbed or passes straight through. Revopoint’s spec sheet for the POP 3 says to use scanning spray on transparent, dark or highly reflective objects. Apple’s Object Capture guidance also recommends avoiding reflective, transparent and very thin objects, and using diffuse light to limit highlights.
Your options, from simplest to most specialized:
- Scanning spray: a thin matte coating that gives the scanner a surface to see. Use a product the scanner maker sells or approves, and test it on a hidden spot first.
- Diffuse lighting: soft, even light reduces glare for photogrammetry and structured light.
- Laser modes: Creality states its RaptorX can scan black and metal objects without spray, using its blue laser lines.
Free 3D scanner apps: iPhone and photogrammetry
Free 3D scanner apps and photogrammetry software let you try scanning before buying any hardware. They work best on textured, matte objects under even light.
- Apple Object Capture: available on iPhone 12 Pro, iPad Pro 2021 and later. It reconstructs a model on the device and outputs USDZ, which you convert to STL or OBJ before slicing.
- RealityScan (Epic Games): the desktop app formerly called RealityCapture is free for students, educators, and individuals and companies under $1 million in annual gross revenue. RealityScan Mobile captures photos with a phone or tablet.
Photogrammetry is a good fit for statues, large props and architectural details, where a few millimeters of error do not matter. For a replacement clip or a bracket that has to mate with existing parts, calipers and CAD are usually faster and more exact.
What a 3D scan is good for, and what it is not
A 3D scan is best treated as an accurate reference shape, not a finished part. Scans capture surfaces, not design intent: holes come out slightly oval, flat faces come out wavy, and threads or snap features rarely survive.
- Good uses: copies of sculptures and figures, custom-fit items shaped to a body or object, and curved surfaces to model over, such as the trim pieces in our 3D printed car parts guide.
- Poor uses: precise mechanical parts, threads and tight-tolerance fits; redraw these in CAD using the scan only for overall shape.
- Rights: scanning an artwork or a branded product does not give you the right to share or sell copies. If you want ready-made models instead, see our guide to Thingiverse 3D prints and how model licenses work.
The bottom line
A 3D scanner for 3D printer projects is worth it when you copy organic or curved shapes that would take hours to model, not for simple brackets. Compare scanners by accuracy, point distance, working distance and scan volume from the maker’s own spec pages, and plan for scanning spray and mesh cleanup. To test the idea first, a free photogrammetry app shows what scanning can and cannot do.
Sources
- Shining 3D: EinScan SE V2 product page and EinScan SE V2 specifications (accuracy 0.1 mm or better, point distance 0.17–0.2 mm, white LED, single shot under 1 s, turntable under 45 s, 290–480 mm working distance, 200 mm turntable volume, 30 mm to 700 mm scan volume, OBJ/STL/3MF export, watertight STL output)
- Revopoint: POP 3 specifications (infrared structured light, accuracy up to 0.1 mm, precision up to 0.05 mm, fused point distance up to 0.05 mm, 150–400 mm working distance, 20 mm to 2 m scan volume, scanning spray for transparent, dark or reflective objects, PC requirements, output formats)
- Creality: RaptorX product page (volumetric accuracy 0.02 mm + 0.06 mm/m, 34 cross and 7 parallel blue laser lines plus infrared, objects 5–4,000 mm, black and metal objects without spray, marker scanning, system requirements)
- Epic Games: RealityScan 2.0 announcement (RealityCapture renamed RealityScan; free under $1 million annual gross revenue; RealityScan Mobile)
- Apple: iPad Pro with LiDAR Scanner (distance up to 5 meters) and Meet Object Capture for iOS (iPhone 12 Pro, iPad Pro 2021 and later; USDZ output; avoid reflective, transparent and thin objects; diffuse lighting)