Over extrusion in 3D printing means the printer pushes out more plastic than the slicer planned. It shows as blobs and zits, ridges or a rough, overfilled top surface, bulging walls and parts that come out oversized. Check the filament diameter setting and extruder calibration, lower the flow ratio, and trim the nozzle temperature.
It is the mirror image of our guide to 3D printing under extrusion, and the fixes use the same settings in the opposite direction. The full flow test belongs to calibration, covered step by step in our guide on how to calibrate a 3D printer.
The short answer
| Sign | Likely cause | Fix |
|---|---|---|
| Rough, ridged top surface | Flow ratio too high | Lower flow 1–2% at a time |
| Everything far too thick | Wrong filament diameter in the slicer | Match the profile to the filament |
| Too much plastic on every line, even after flow changes | Extruder steps too high | Recalibrate e-steps or rotation distance |
| Blobs, oozing, strings | Nozzle too hot | Lower 5–10 °C within the spool’s range |
| Bulging corners only | Pressure advance too low | Calibrate pressure advance |
| Flared, ridged first layer only | Nozzle too close to the bed | Raise the Z offset |
What are the signs of over extrusion in 3D printing?
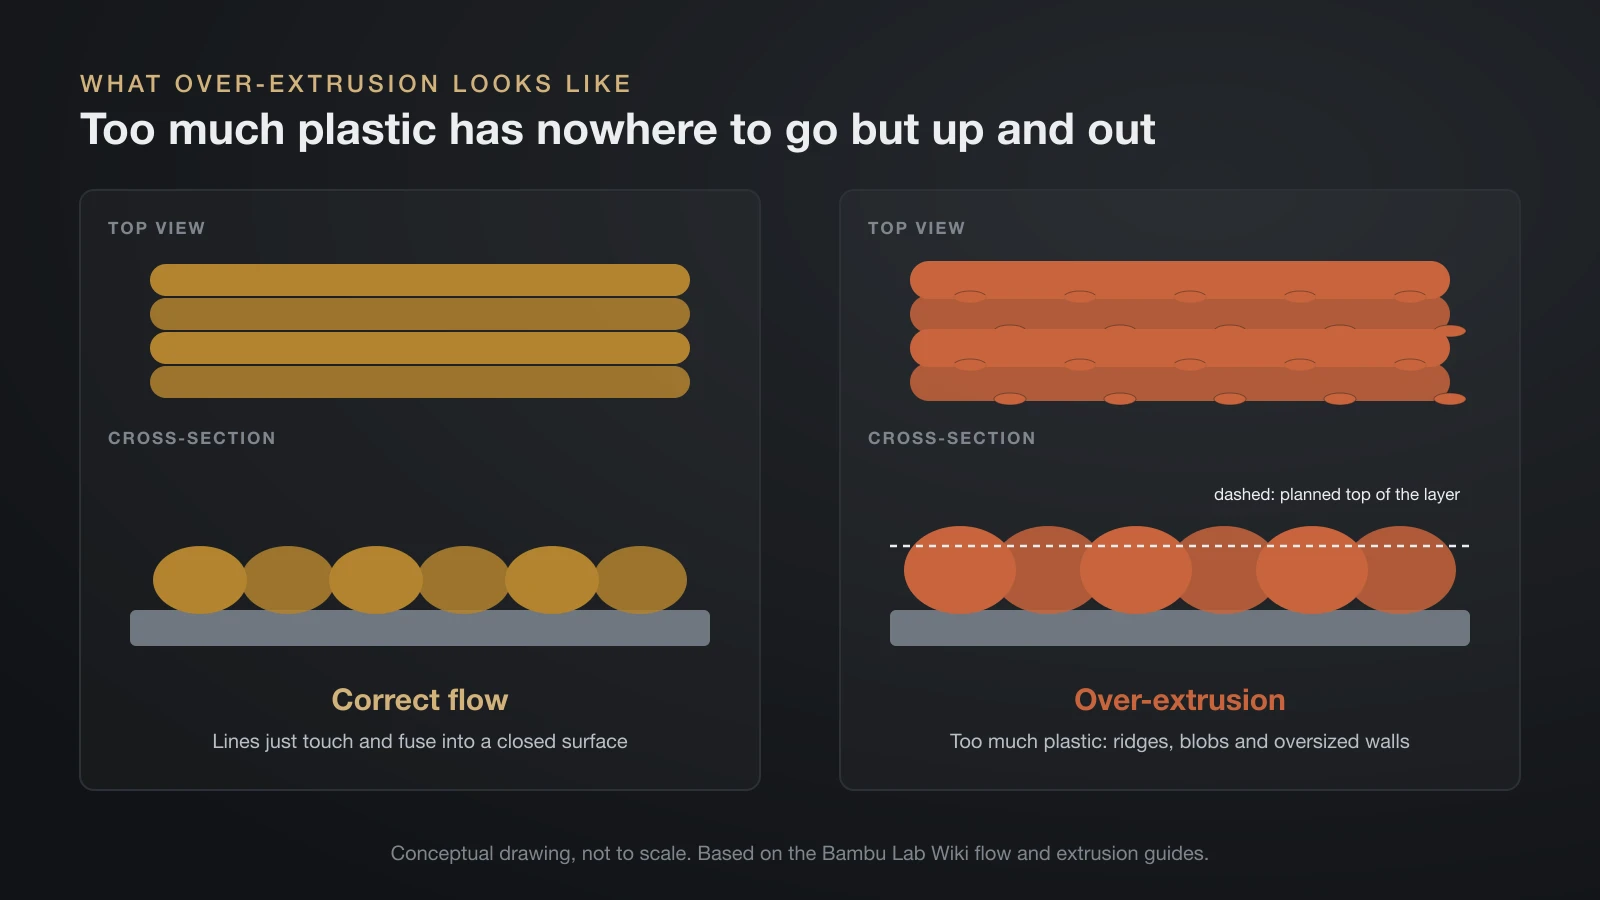
The signs of over extrusion in 3D printing are extra plastic where the slicer planned none: blobs, ridges and surfaces that look crowded. Bambu Lab lists blobs or zits, lines that overlap too much, layers that seem too thick and a rough or uneven surface. Polymaker adds raised ridges between surface lines and plastic that spills beyond its intended boundaries.
Prusa describes two telltale places. Bottom layers get scarred, and top layers build up material, especially near the perimeters, leaving an uneven surface. The practical result is that parts stop fitting together.
Dimensions give it away too. Outer walls bulge and holes shrink, so a bolt or pin that should slide in gets stuck. Measure a simple part with calipers; if it is consistently larger than designed, suspect over-extrusion before touching anything else.
Signs that look like over-extrusion but aren’t
Some defects look similar but have other causes:
- Elephant’s foot: only the bottom layers flare out. That is usually a nozzle set too close to the bed or a hot bed, covered in our guide to first layer problems.
- Bulging corners only: a pressure advance problem, not a flow problem.
- A single blob on the seam: where each layer starts and ends, and usually a seam or retraction issue.
- Random thick spots: Bambu Lab links uneven lines of local over- and under-extrusion to filament with inconsistent diameter.
What causes over extrusion in 3D printing?
Over extrusion in 3D printing comes from settings that tell the printer to push too much plastic, or from plastic that flows more than planned. These are the usual causes, in the order worth checking.
Wrong filament diameter in the slicer
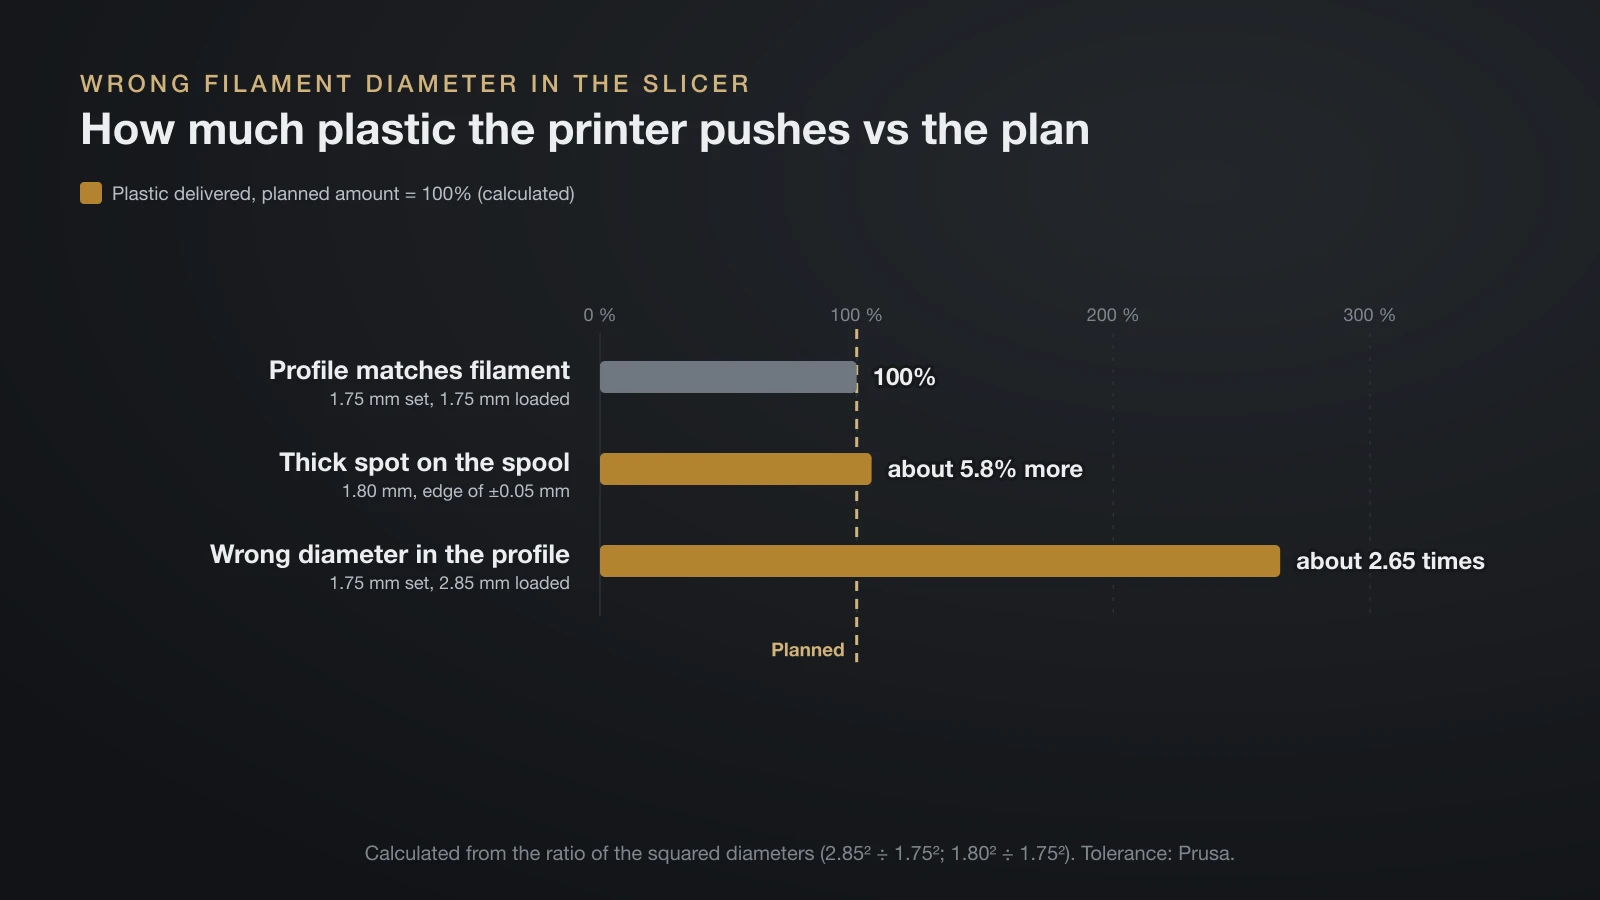
The slicer converts the volume of every line into a length of filament, using the diameter in the filament profile. If that diameter is smaller than the filament you load, the printer feeds too much. A profile set to 1.75 mm on a printer that takes 2.85 mm filament pushes about 2.65 times the planned plastic (calculated: 2.85² ÷ 1.75²).
Smaller mismatches matter too. Our 1.75 mm filament guide shows that a spool section at 1.80 mm, at the edge of a ±0.05 mm tolerance, carries about 5.8% more plastic than the slicer expects.
Flow ratio (extrusion multiplier) set too high
Flow ratio, called the extrusion multiplier in PrusaSlicer, scales every extrusion move. The default is 1, meaning 100%. Prusa gives 0.9–1.1 as the typical range, so a value copied from another filament or another printer can easily be a few percent too high.
Bambu Lab recommends running its flow dynamics calibration before flow rate calibration, and keeping the default flow ratio with its own filaments.
Extruder steps too high
If the extruder feeds more filament than the firmware asks for, every line is too thick, whatever the slicer says. This happens after an extruder swap or a firmware reset. Marlin stores the value as e-steps and Klipper as rotation distance; step 2 of our calibration guide has the 50 mm test that checks it.
Nozzle temperature too high
A nozzle running too hot makes the plastic runnier, so it oozes and strings. Prusa links stringing to very high printing temperatures and suggests trying 5–10 °C lower, and Bambu Lab lists stringing, drooping overhangs and discoloration as the cost of too much heat. Stay within the range on your spool, for example 190–230 °C (374–446 °F) for standard PLA in our PLA temperature guide.
Pressure advance too low
When the print head slows into a corner, pressure in the nozzle lags behind and keeps pushing plastic. Bambu Lab explains that a wrong pressure advance value causes too much or too little extrusion at speed changes. If only the corners bulge, calibrate pressure advance and leave the flow ratio alone.
First layer squished too hard
A Z offset that puts the nozzle too close to the bed squeezes the first layer into ridges and a flared base. It looks like over-extrusion, but the fix is the Z offset, not the flow ratio.
How to fix over extrusion in 3D printing
Fix over-extrusion from the root outward: settings that can be badly wrong first, fine-tuning last. Print a small test part after each change.
- Check the slicer profile. Printer, nozzle size, filament type and filament diameter must match what is installed.
- Measure the filament. Take caliper readings at several points; a spool that runs thick explains local blobs.
- Check the extruder steps if the printer’s extruder was changed or reset.
- Trim the nozzle temperature 5 °C at a time within the spool’s range, especially if you see oozing.
- Lower the flow ratio 1–2% at a time, as Prusa recommends, until the top surface is smooth without gaps.
- Tune pressure advance if corners still bulge.
- Save the result in a named filament profile. Our guide to 3D printing slicer settings shows where each value lives.
Don’t cut flow to fix a first-layer problem or a single seam blob. Lower flow on the whole print trades one fault for under-extrusion everywhere else.
The flow calibration test, explained
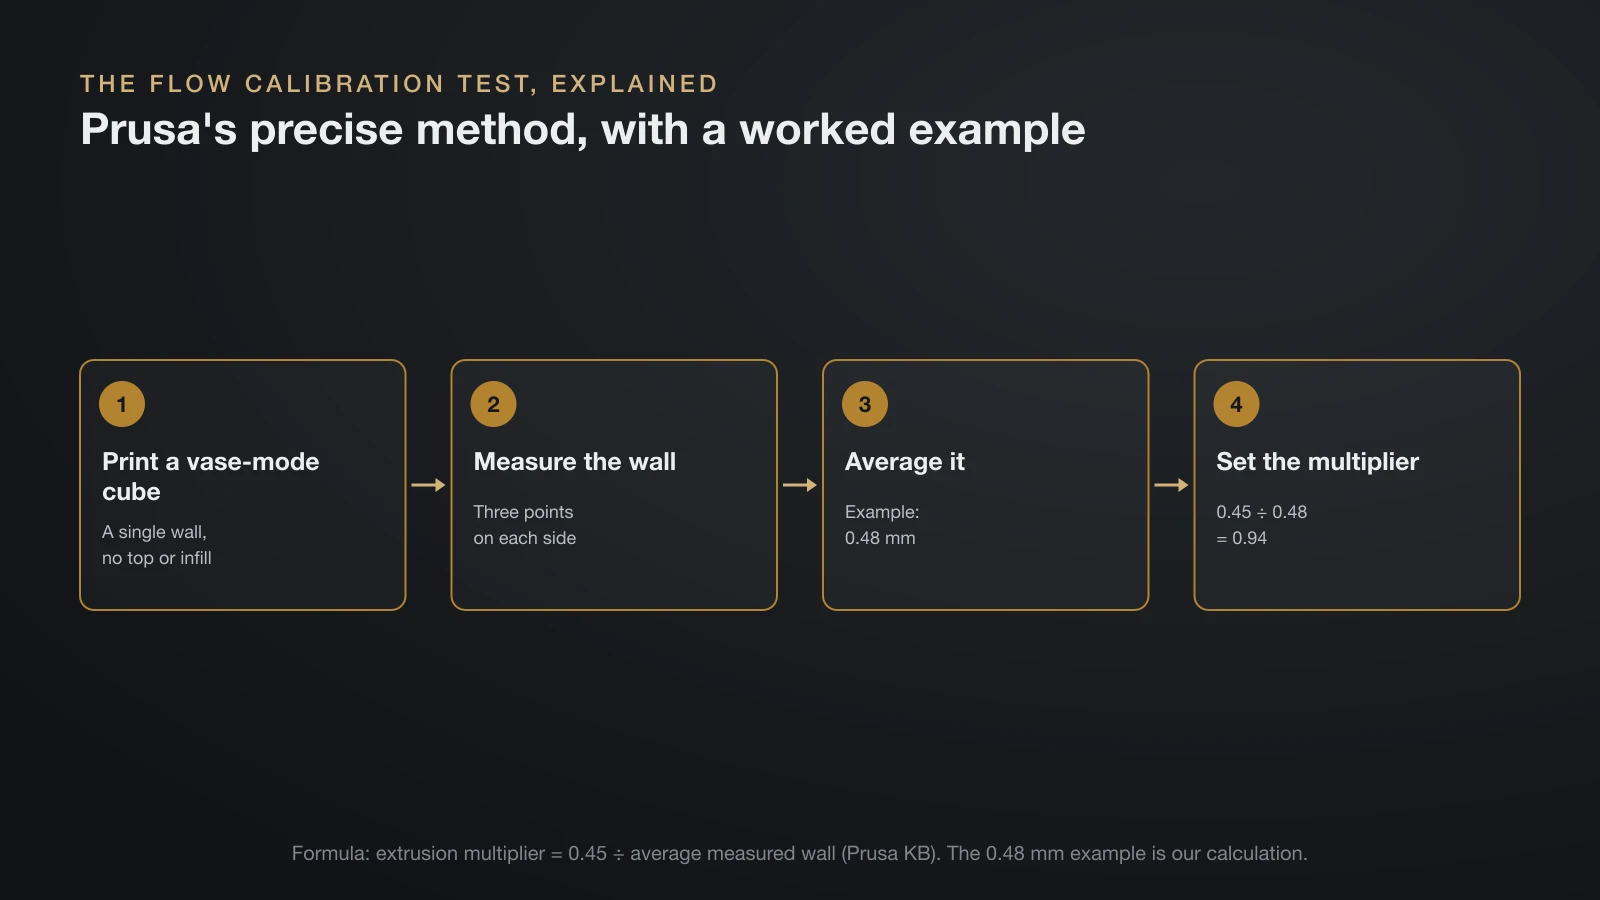
A flow calibration test prints the same shape at several flow values, so you pick the best one instead of guessing. Each slicer has its own version, and our calibration guide walks through them in order.
- Prusa, precise method: print a calibration cube in vase mode, measure the single wall at three points per side and average them. Extrusion multiplier = 0.45 ÷ average measured thickness.
- Prusa, visual method: look at the top layer; buildup near the perimeters means lower, gaps mean higher, in 1–2% steps.
- Bambu Studio: a coarse pass from 80% to 120% of the current value in 5% steps, then a fine pass in 1% steps. Automatic flow calibration is limited to the X1 series.
- OrcaSlicer: its recommended YOLO test prints eleven blocks from −0.05 to +0.05 around the current value in 0.01 steps, and OrcaSlicer recommends a flow ratio between 0.95 and 1.05.
A worked example of Prusa’s formula (calculated): if the vase-mode wall averages 0.48 mm, the new multiplier is 0.45 ÷ 0.48 = 0.94.
Over extrusion vs under extrusion: what’s the difference?
Over-extrusion puts down too much plastic and under-extrusion too little, and both come from the same settings pushed in opposite directions. Bambu Lab sums it up in one line: too high a flow rate gives blobs or overlapping lines, too low a flow rate gives gaps.
| Over-extrusion | Good extrusion | Under-extrusion | |
|---|---|---|---|
| Line cross-section | Squashed and spreading into its neighbors | Lines just touching and fused | Round beads with gaps between them |
| Top surface | Ridged, rough | Smooth, even | See-through gaps |
| Walls | Bulging, oversized | On size | Thin, porous |
| Main risk | Poor fit, looks | None | Weak parts |
Polymaker points out the practical difference: over-extrusion is easy to see, while under-extrusion can hide inside a part and weaken it. That is why the fix for one should never overshoot into the other.
The bottom line
Over extrusion in 3D printing is too much plastic per line, seen as blobs, ridges, rough top layers and oversized parts. Rule out a wrong filament diameter and miscalibrated extruder first, then lower the flow ratio 1–2% at a time and trim the nozzle temperature. Bulging corners point to pressure advance, and a flared first layer points to the Z offset, so fix those where they start.
Sources
- Bambu Lab Wiki: Flow rate calibration, Under-extrusion and Volumetric speed (signs, pressure advance, test ranges, effects of too much heat)
- Prusa Knowledge Base: Extrusion multiplier calibration, Stringing and oozing and Under-extrusion (signs, 0.9–1.1, 0.45 formula, 5–10 °C, ±0.05 mm)
- OrcaSlicer Wiki: Flow ratio calibration and Flow ratio and pressure advance (YOLO test, 0.95–1.05 range)
- Polymaker Wiki: Over-extrusion vs. under-extrusion