PLA temperature settings sit in a forgiving window. Manufacturer data sheets list 190–230 °C (374–446 °F) for the nozzle and about 35–65 °C (95–149 °F) for the bed, depending on the brand and the build plate. Start in the middle of your spool’s range, around 210 °C (410 °F), then fine-tune it with a temperature tower.
The exact number depends on the spool, how fast you print and the surface you print on. This guide collects the settings from Bambu Lab, Prusa and Polymaker data sheets, explains how silk, matte, toughened and high temperature PLA differ, and shows how much heat a finished part can take. For brand-by-brand toughness numbers, see our PLA+ vs PLA comparison.
The short answer
| Setting | Typical PLA value | Where it comes from |
|---|---|---|
| Nozzle temperature | 190–230 °C | Bambu Lab and Polymaker data sheets |
| Good starting point | 210–215 °C | Prusament (210 ± 10 °C), Prusa profile (215 °C first layer) |
| Bed, PEI sheet | 45–65 °C | Bambu Lab plate guide; Prusa uses 60 °C |
| Bed, cool plate | 35–45 °C | Bambu Lab |
| Heated bed required? | No, but it helps adhesion | Prusa |
| Part cooling fan | On, 100% | Prusament, Bambu Lab |
| Silk PLA nozzle | 210–240 °C, 235 °C suggested | Bambu Lab |
| Finished parts soften | Above about 55–60 °C | Heat deflection 55–60 °C at 0.45 MPa |
PLA print temperature: nozzle settings by brand
Standard PLA prints at 190–230 °C in Bambu Lab’s and Polymaker’s data sheets, and Prusament narrows that to 200–220 °C. Your spool’s own range is printed on the label and in its technical data sheet; the table shows how closely the brands agree.
| Filament or profile | Nozzle temperature | Notes |
|---|---|---|
| Bambu Lab PLA Basic | 190–230 °C | Made for fast printing, under 300 mm/s |
| Polymaker PolyLite PLA | 190–230 °C | 50–200 mm/s |
| Prusament PLA | 210 ± 10 °C (200–220 °C) | Up to 200 mm/s |
| Prusa default PLA settings | 215 °C first layer, 210 °C after | Prusa Knowledge Base |
| OrcaSlicer generic PLA | 180–220 °C | General table, not brand specific |
Why such a wide window? Formulas differ between brands, and speed changes the heat you need. Bambu Lab’s filament guidance explains that at high print speeds the nozzle has to melt more material in less time, so it needs more heat, while slow printing at a high temperature invites stringing and oozing. OrcaSlicer’s calibration guide agrees: use the middle of the range that prints well, and the upper end if you print at high speed or flow.
Bed temp for PLA: settings for each build plate
Set the bed to 45–65 °C on PEI or 35–45 °C on a cool plate, the ranges Bambu Lab gives for PLA; Prusa uses 60 °C on its PEI sheets. Prusa notes that PLA does not require a heated bed at all, although a warm bed makes the first layer grip more reliably. The right number depends mostly on the surface you print on.
| Build surface | PLA bed temperature | Source |
|---|---|---|
| Bambu Lab Cool Plate | 35–45 °C (95–113 °F) | Bambu Lab filament guide |
| Smooth PEI or high temperature plate | 45–65 °C | Bambu Lab filament guide |
| Textured PEI | 45–65 °C, default 55 °C (131 °F) | Bambu Lab filament guide |
| Engineering plate | 45–65 °C, glue required | Bambu Lab filament guide |
| Smooth or satin PEI (Prusa) | 60 °C (140 °F) | Prusa Knowledge Base |
| Prusament PLA, any listed sheet | 40–60 °C | Prusament data sheet |
| Polymaker PolyLite PLA | 25–60 °C | Polymaker data sheet |
Polymaker’s wiki narrows it down: 40–50 °C suits standard PLA and avoids softening the bottom layers too much, while 60–65 °C helps large prints and cool rooms.
Watch the bed temperature in an enclosed printer. A hot bed inside a closed box warms the chamber, and PLA can soften in the extruder before it reaches the melt zone, a clog known as heat creep. Bambu Lab recommends opening the door or removing the top glass whenever a PLA bed runs above 45 °C, and lowering the bed 5–10 °C below its 55 °C default on hot days; our enclosed 3D printer guide explains why.
If the first layer will not stick at the right temperature, the cause is usually the surface, not the heat. Clean the plate (Bambu Lab recommends hot water and dish soap), make sure you level the 3D printer bed, and match the plate to the material; our guide to the 3D printer build plate compares the common surfaces.
First layer vs later layers
Many profiles print the first layer slightly differently from the rest. Prusa’s PLA settings use 215 °C (419 °F) for the first layer and 210 °C for the others, with the bed at 60 °C throughout. OrcaSlicer notes that a hotter first layer can improve bed adhesion, but too much heat squashes the bottom layers outward into an “elephant foot.”
A simple way to set it up:
- First layer: a few degrees above your main temperature; Prusa’s profile adds 5 °C.
- Later layers: the temperature you picked from your temperature tower.
- Bed: one value for the whole print is normal. If the bottom edge bulges, lower the bed or the first-layer temperature before changing anything else.
PLA temperature by type: silk, matte, PLA+ and high temp PLA
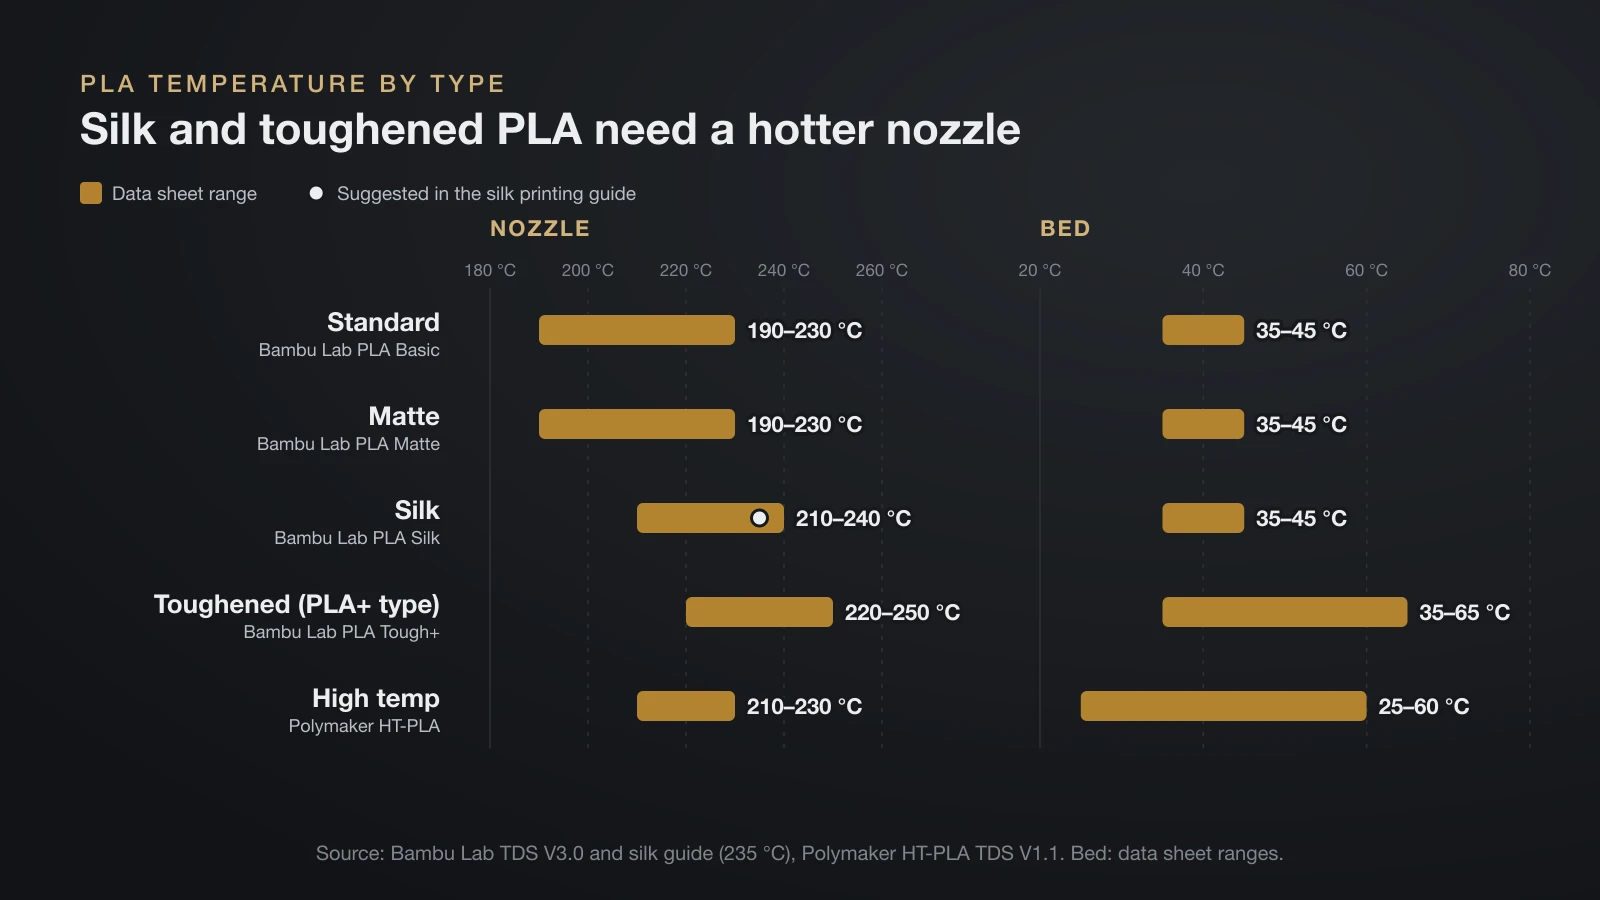
Additives change how PLA melts and flows, so specialty PLAs come with their own ranges. To compare like with like, the first four rows come from one manufacturer’s data sheets, Bambu Lab’s; high temperature PLA comes from Polymaker.
| PLA type (data sheet) | Nozzle | Bed | What changes |
|---|---|---|---|
| Standard: Bambu Lab PLA Basic | 190–230 °C | 35–45 °C | Baseline |
| Matte: Bambu Lab PLA Matte | 190–230 °C | 35–45 °C | Same settings as standard PLA |
| Silk: Bambu Lab PLA Silk | 210–240 °C | 35–45 °C | Hotter, for layer bonding and gloss |
| Toughened (PLA+ type): Bambu Lab PLA Tough+ | 220–250 °C | 35–65 °C | Starts 30 °C above PLA Basic |
| High temp: Polymaker HT-PLA | 210–230 °C | 25–60 °C | Normal settings, heat-stable part |
Silk PLA temperature
Silk PLA gets its shine from pearlescent additives, and Bambu Lab says it usually needs a higher temperature to bond its layers, about 210–240 °C. Its silk printing guide recommends 235 °C (455 °F) for both the first and the later layers. The additives cost strength across the layers: Bambu Lab rates its PLA Silk at about 65% of PLA Basic’s strength in the Z direction.
Gloss depends on speed as much as on heat. Bambu Lab suggests outer walls at 40–60 mm/s, starting at 50 mm/s, and a constant wall speed so the shine looks even across the part.
High temp PLA
High temp PLA, sold as HT-PLA, prints at ordinary PLA settings: Polymaker lists 210–230 °C for the nozzle and 25–60 °C for the bed. The difference shows after printing. Polymaker says HT-PLA keeps its shape up to 150 °C (302 °F) without sagging under its own weight, but under load it behaves like normal PLA until it is annealed, as the heat table below shows.
How to find your spool’s sweet spot with a temperature tower
A temperature tower is one print made of stacked blocks, each printed at a different nozzle temperature. It is the quickest way to tune one specific spool, and OrcaSlicer calls temperature the calibration with the biggest impact on print quality.
- Read the range on the spool or data sheet, for example 190–230 °C for Bambu Lab PLA Basic.
- Generate a tower across that range. OrcaSlicer includes one as a built-in calibration test.
- Print it at your normal speed and cooling, because the best temperature shifts with speed.
- Inspect each block for stringing, drooping bridges and overhangs, and surface quality. Then try to snap the tower: blocks whose layers split easily were printed too cold.
- Pick the middle of the blocks that look good, or the upper end if you print fast, as OrcaSlicer suggests.
- Save it in the filament profile and repeat for every new brand or PLA type.
A temperature tower is one step in a longer sequence. Our guide on how to calibrate a 3D printer shows where it fits between the first layer and flow tuning.
Signs your PLA temperature is too hot or too cold
PLA printed too hot strings, oozes and sags on bridges, while PLA printed too cold leaves thin, gappy walls and layers that split apart. Bed temperature shows up in the first layer instead.
| What you see | Likely cause | What to try |
|---|---|---|
| Stringing and oozing | Nozzle too hot, or damp filament | Lower the nozzle in small steps; dry the spool |
| Sagging bridges and overhangs | Nozzle too hot | Lower the nozzle; check the part cooling fan |
| Thin, gappy walls | Nozzle too cold for the speed | Raise the temperature or slow down |
| Layers that split easily | Nozzle too cold | Raise the temperature |
| Clogs in an enclosed printer | Heat creep from a warm chamber | Open the door, lower the bed |
| First layer lifts or will not stick | Bed too cold, dirty or unlevel | Clean the plate, raise the bed within range |
| Bottom edge bulges outward | Bed or first layer too hot | Lower the bed or first-layer temperature |
OrcaSlicer lists stringing as a risk at both ends: too cold and too hot. In practice, lowering the temperature usually reduces it, but retraction and moisture matter just as much, and Bambu Lab lists stringing among the defects of printing damp filament.
Warping is rare with PLA; Prusa describes it as not prone to significant warping. When corners do lift, Polymaker’s wiki points to uneven cooling, a cold room or the wrong bed temperature.
PLA temperature resistance: how hot can printed PLA get?
PLA parts soften far below the nozzle temperature. The number to know is the glass transition temperature (Tg), where the plastic turns from rigid to rubbery. It sits around 60 °C (140 °F): 60 °C on Bambu Lab’s PLA Basic data sheet and 61 °C on Polymaker’s PolyLite PLA sheet.
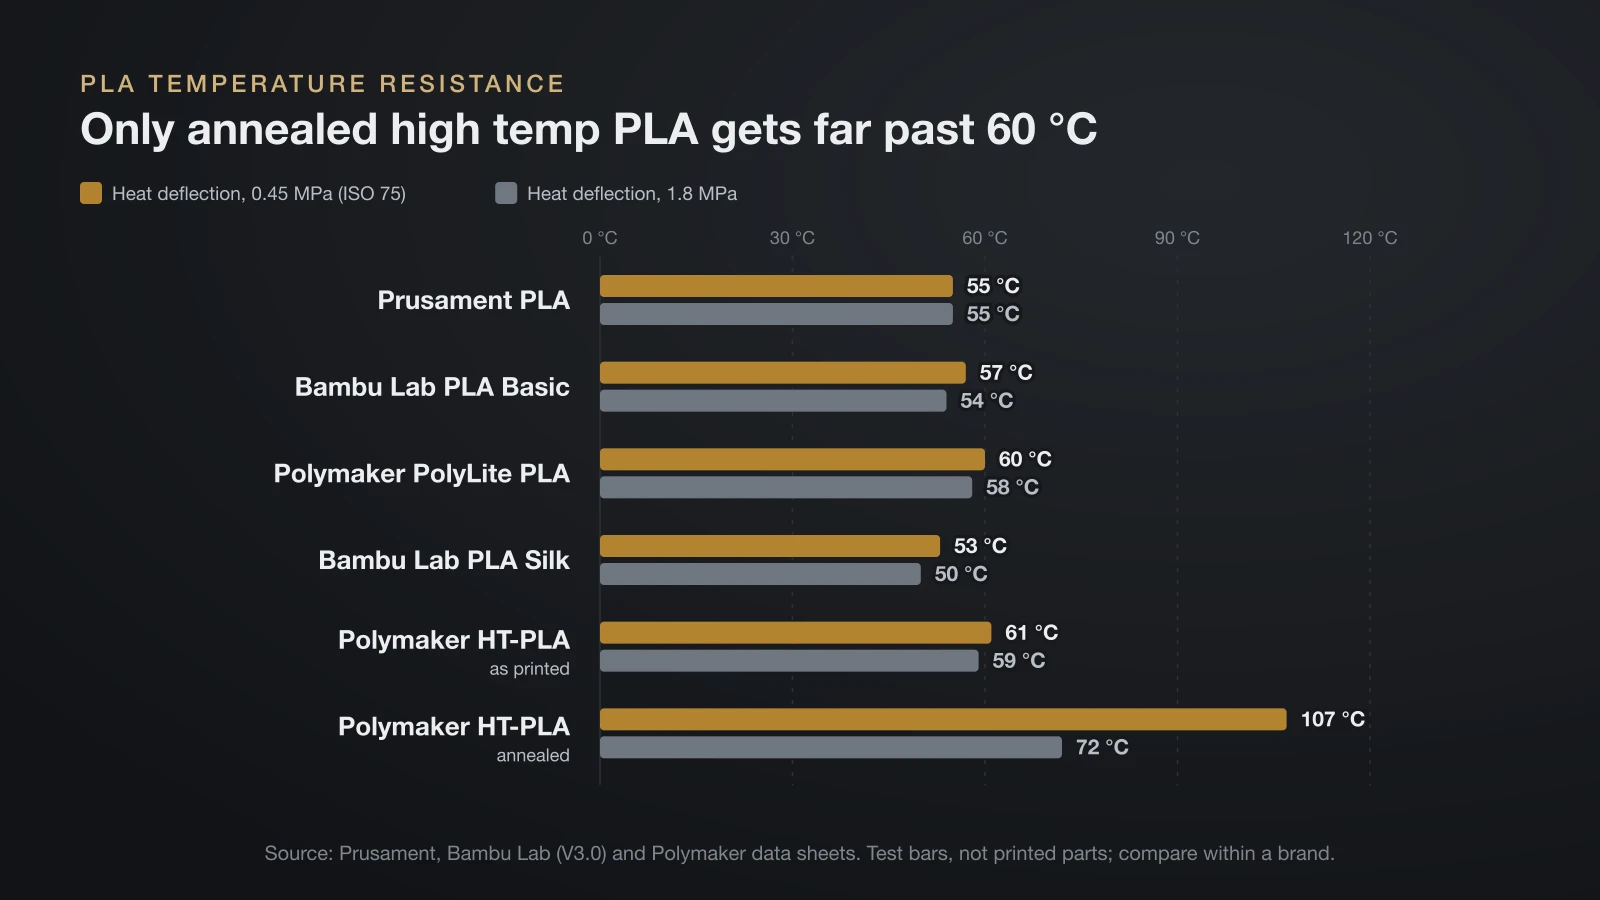
Heat deflection temperature (HDT) is more practical: the temperature at which a loaded test bar bends by a set amount (ISO 75). Data sheets test it under a light 0.45 MPa load and a heavier 1.8 MPa load.
| Filament (data sheet) | Glass transition (DSC) | HDT, 0.45 MPa | HDT, 1.8 MPa |
|---|---|---|---|
| Prusament PLA | Not listed | 55 °C | 55 °C |
| Bambu Lab PLA Basic | 60 °C | 57 °C | 54 °C |
| Polymaker PolyLite PLA | 61 °C | 60 °C | 58 °C |
| Bambu Lab PLA Silk | 57 °C | 53 °C | 50 °C |
| Polymaker HT-PLA, as printed | 60 °C | 61 °C | 59 °C |
| Polymaker HT-PLA, annealed | Not listed | 107 °C | 72 °C |
In practice, Prusament says PLA parts start to lose mechanical strength above 60 °C, and Bambu Lab’s PLA guide notes that PLA Basic deflects at only 57 °C, so parts that sit near that temperature can soften and deform. That rules out anything that sits in a parked car in summer; our guide to 3D printed car parts compares filaments that cope.
PLA’s melting temperature is much higher, 150 °C on Polymaker’s data sheet and 160 °C on Bambu Lab’s (DSC), but a loaded part fails long before that.
High temp PLA helps only after annealing: Polymaker’s HT-PLA deflects at 61 °C under the light load as printed and at 107 °C (225 °F) after 30 minutes at 80–90 °C. For warm spots without annealing, PETG is the simpler switch; see our PETG print temperature guide.
The bottom line
Print PLA inside the range on the spool, usually 190–230 °C, starting near 210 °C, with the bed at 35–45 °C on a cool plate or 45–65 °C on PEI. Run a temperature tower for each new spool and use the middle of the good blocks. Silk PLA wants more heat, around 235 °C, and finished PLA parts should stay below about 50–60 °C unless they are annealed high temperature PLA.
Sources
- Bambu Lab technical data sheets, version 3.0: PLA Basic, PLA Matte, PLA Silk and PLA Tough+ (nozzle and bed ranges, speed, glass transition, melting and heat deflection temperatures)
- Bambu Lab Wiki: PLA usage guide, PLA Silk printing guide, PETG usage guide and filament guide (bed temperature per plate, door and top glass guidance, heat creep, 55 °C default, 57 °C heat deflection, plate cleaning, silk temperature, speed and strength, speed vs nozzle temperature)
- Prusa: PLA material guide and Prusament PLA page and data sheet (215/210 °C and 60 °C profile, no heated bed required, low warping, 210 ± 10 °C and 40–60 °C, 100% fan, build surfaces, heat deflection 55 °C, strength loss above 60 °C)
- Polymaker: PolyLite PLA data sheet, HT-PLA data sheet and build plate temperature wiki page (print settings, glass transition, melting and heat deflection temperatures, annealing, bed temperature advice, causes of warping)
- OrcaSlicer Wiki: Temperature calibration and Material temperatures (temperature tower method, effects of too hot and too cold, first layer and elephant foot, generic PLA ranges)