3D printing under extrusion means the nozzle lays down less plastic than the slicer planned, leaving gaps between lines, thin or weak walls and missing layers. Most cases trace back to a partial clog, poor grip at the extruder, printing faster than the hotend can melt, a nozzle that is too cool, or wrong flow and filament settings.
Check the causes in order, from the free and quick to the slow. A blocked nozzle has its own step-by-step fix in our guide to a clogged 3D printer nozzle, and grinding or clicking gears point to the 3D printer extruder.
The short answer
| What you see | Likely cause | First fix |
|---|---|---|
| Gaps across the whole surface | Low flow ratio, wrong filament profile or a partial clog | Extrude by hand, then check the slicer profile |
| Fine when slow, gaps when fast | Hotend cannot melt that much plastic per second | Slow down, or raise the nozzle 5–10 °C |
| Gaps only at corners or line starts | Pressure advance value wrong | Run flow dynamics or pressure advance calibration |
| Clicking extruder, curling strand | Partial clog or nozzle too cool | Clear the nozzle, check the temperature |
| Random patches | Spool snag, tangled filament or diameter variation | Check the spool and the filament path |
| First layer only | Nozzle too close to the bed | Raise the Z offset |
| Weak, uneven lines on a sensitive material | Wet filament | Dry the spool |
What does under-extrusion look like?
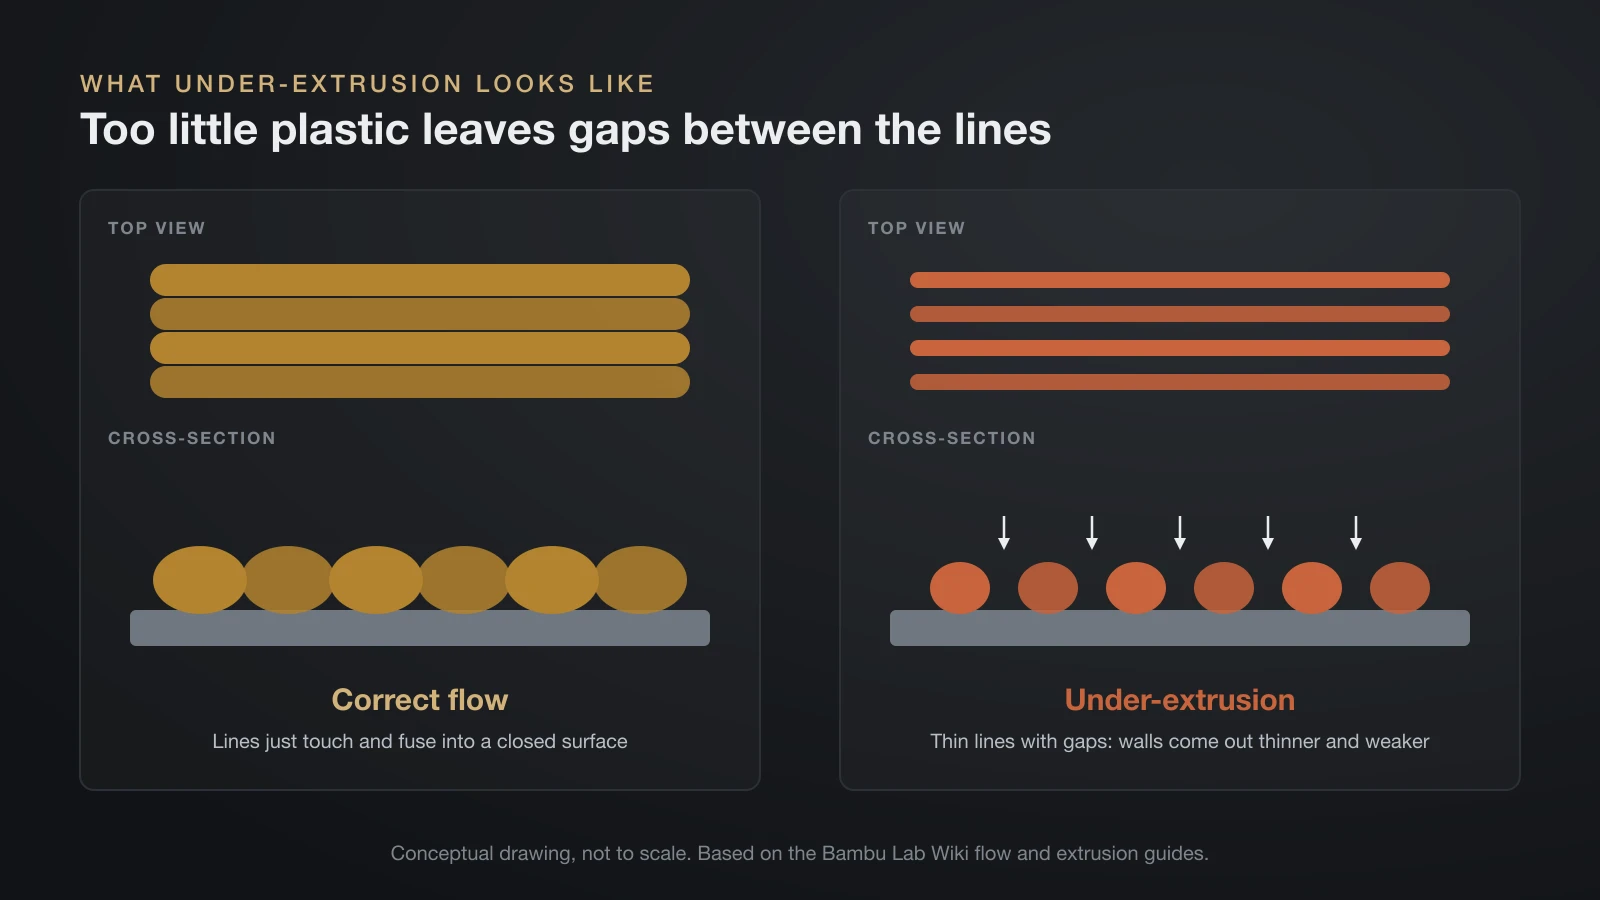
Under-extrusion looks like a print with too little plastic: lines that don’t touch, gaps in walls and top surfaces, and layers that are thin or missing. Bambu Lab splits it into global under-extrusion, where the lines are sparse over the whole surface, and localized under-extrusion, where they thin out in one area. Prusa adds that under-extruded parts become fragile and break easily.
Less obvious signs are dimensional. When a hotend cannot keep up, Bambu Lab says walls come out thinner than planned: a 0.45 mm wall might measure 0.35 mm or less. The same shortage weakens layer bonding and can change the gloss of the surface.
Polymaker warns that under-extrusion can hide. A part may look fine outside while its infill is sparse and its layers are poorly bonded, which makes it the more dangerous of the two extrusion faults for functional parts.
What causes 3D printer under-extrusion?
3D printer under-extrusion has three broad causes, in Bambu Lab’s grouping: too much resistance in the filament path, a hotend that cannot melt enough plastic, and settings that ask for too little. Filament quality and the first layer add a few more.
Resistance in the filament path
Anything that holds the filament back reduces what reaches the nozzle. Bambu Lab lists a spool that doesn’t turn freely or is tangled, a kinked, worn or blocked PTFE tube, jammed or damaged extruder gears, and a clogged nozzle, which is common after long prints or fiber-filled filaments.
Idler tension matters too. Prusa says too loose lets the gears slip and too tight grinds the filament. On a Bowden printer the tube adds length and friction, one of the trade-offs covered in our comparison of direct drive vs Bowden extruders.
Printing faster than the hotend can melt
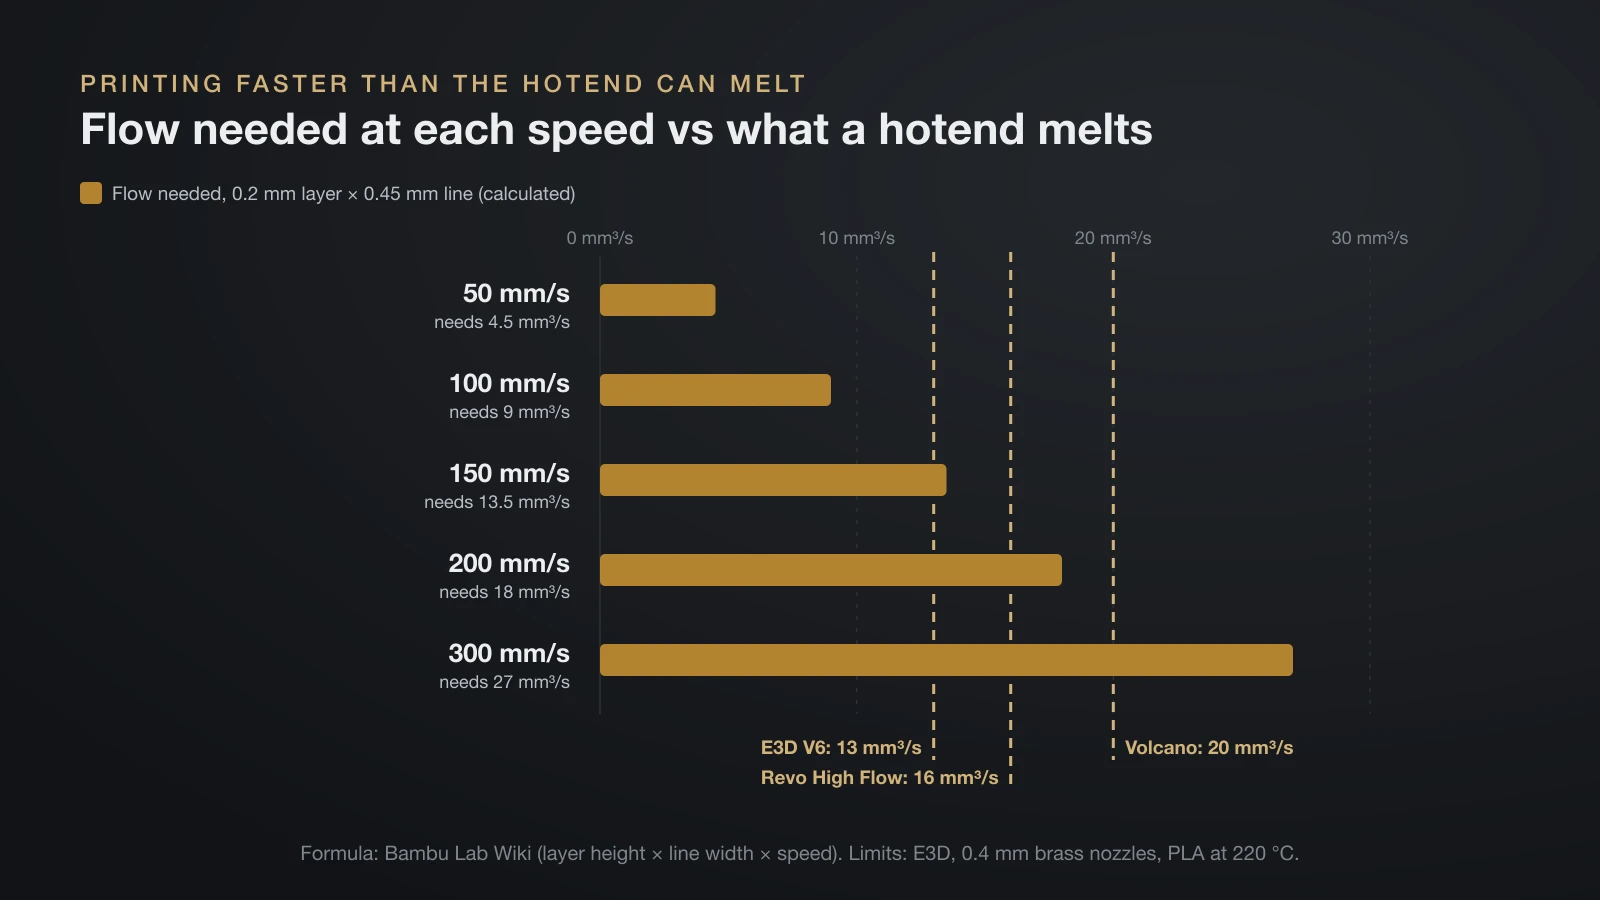
Every hotend has a maximum volumetric flow, the cubic millimeters of plastic (mm³/s) it can melt each second. Bambu Lab’s formula for what a print asks for is layer height × line width × print speed. A 0.2 mm layer with a 0.45 mm line needs 18 mm³/s at 200 mm/s and 27 mm³/s at 300 mm/s.
| Print speed (0.2 mm layer, 0.45 mm line) | Flow needed |
|---|---|
| 50 mm/s | 4.5 mm³/s |
| 100 mm/s | 9 mm³/s |
| 150 mm/s | 13.5 mm³/s |
| 200 mm/s | 18 mm³/s |
| 300 mm/s | 27 mm³/s |
Compare that with published limits. E3D rates its 0.4 mm brass nozzles printing PLA at 220 °C (428 °F) at 13 mm³/s on the V6, 16 mm³/s on the Revo High Flow and 20 mm³/s on the Volcano. By that math (calculated), a V6 reaches its limit near 150 mm/s with these settings, and faster moves come out under-extruded. Our 3D printer hotend guide explains why melt zones differ.
The slicer protects you only if its filament profile holds a realistic max volumetric speed. Bambu Lab recommends its Generic profile, with lower speeds, for third-party filament.
Nozzle temperature too low
A nozzle that is too cool melts filament too slowly, and Bambu Lab lists low temperature alongside speed as a cause of insufficient extrusion. Stay inside the range on your spool, for example 190–230 °C for standard PLA in our PLA temperature guide. Prusa suggests adjusting by 5–15 °C for filaments without a stock profile, and 5–10 °C more for hardened steel or stainless nozzles.
Flow, filament diameter and extruder steps
Wrong numbers in the slicer or firmware under-extrude every line. Check these three:
- Flow ratio (extrusion multiplier). Prusa gives 0.9–1.1 as the typical range and raises it in 1–2% steps when gaps appear. Bambu Lab advises keeping the default flow ratio with its own filament.
- Filament diameter setting. A profile set to 2.85 mm on a printer that uses 1.75 mm filament delivers only about 38% of the planned plastic (calculated: 1.75² ÷ 2.85²). Real spools also vary: Prusa says the industry standard is ±0.05 mm, and a 1.70 mm section carries about 5.6% less plastic, as shown in our 1.75 mm filament guide.
- Extruder steps (e-steps or rotation distance). If the extruder feeds less than it is told, everything is thin. Step 2 of how to calibrate a 3D printer has the 50 mm test.
Wet filament and the first layer
Moisture damages prints, Prusa notes, especially with PETG, ABS and soluble filaments; keep spools in their bags with silica gel or in a dry box. If only the first layer is thin or missing, the nozzle may be so close to the bed that plastic cannot get out, which Prusa and Bambu Lab both describe. Our guide to first layer problems covers the Z offset fix.
Gaps only at corners
If under-extrusion appears only at corners or where lines begin, Bambu Lab points to a wrong pressure advance value, the compensation for pressure lag when the print head speeds up or slows down. Flow dynamics calibration in Bambu Studio, or pressure advance in other slicers, corrects it.
How to fix under-extrusion, step by step
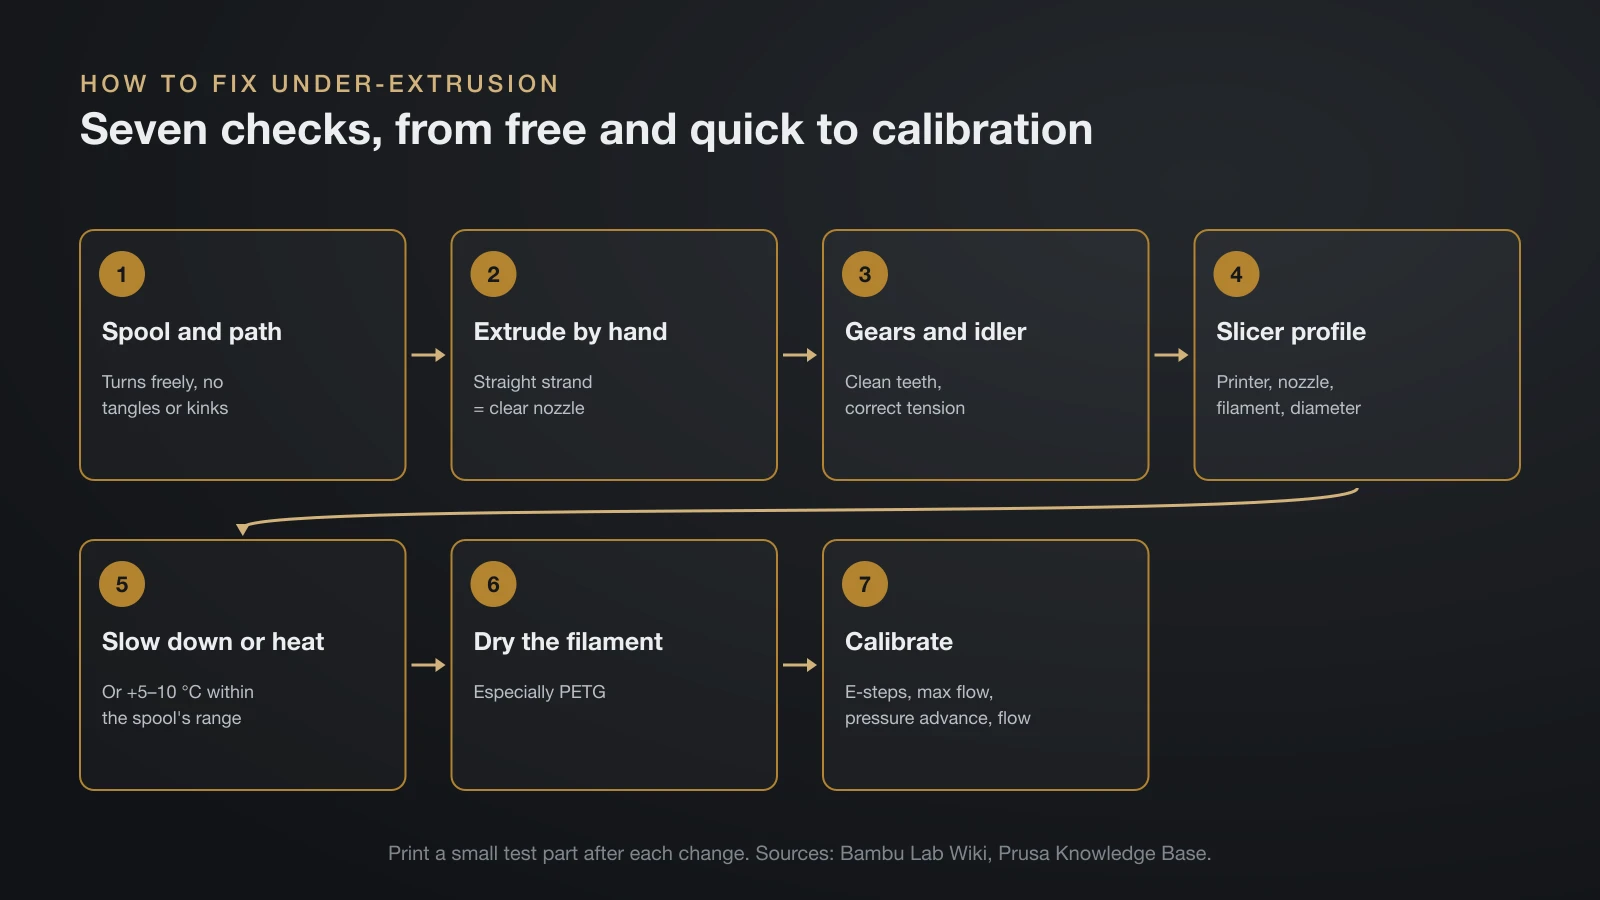
Fix under-extrusion by working from quick, free checks to calibration, and print a small test part after each change so you know which step helped.
- Watch the spool and path. The spool should turn freely, with no tangles, sharp bends or crushed tube. Bambu Lab lists these first.
- Extrude by hand. At printing temperature, a straight, steady strand means the nozzle is clear. A curling or stuttering strand means a partial clog.
- Check the gears and idler. Clean plastic dust from the teeth and set the tension as the printer’s maker describes.
- Check the slicer profile. Printer, nozzle size, filament type and diameter must match what is installed. Prusa’s first advice is its stock profiles through the Configuration Wizard.
- Slow down or add heat. Lower the speed, or raise the nozzle 5–10 °C within the spool’s range. Bambu Lab calls extra heat a last resort, since it can add stringing and droop.
- Dry the filament if it has been out of its bag for a while, especially PETG.
- Calibrate in order: extruder steps, then max volumetric speed, pressure advance and flow, as set out in our calibration guide.
A larger nozzle or thinner layers also lower the load on the hotend. Bambu Lab’s example cuts the flow needed at 250 mm/s from 33.8 to 18 mm³/s by going from 0.3 mm to 0.16 mm layers.
Under-extrusion at the start of a layer or line
Under-extrusion at the start of a line usually means pressure in the nozzle has not built up yet. Bambu Lab ties under-extrusion at speed changes and corners to a wrong pressure advance value, and flow dynamics calibration fixes it.
Oozing is the other suspect. Plastic that leaks out during travel moves is missing when the next line starts. Prusa links oozing to high temperatures and retraction settings, so a start that is thin and a travel that strings often share one cause.
Under-extrusion vs over-extrusion: how to tell them apart
Under-extrusion leaves too little plastic and shows gaps, while over-extrusion leaves too much and shows ridges and blobs. Bambu Lab describes the pair the same way in its flow guide: too high a flow gives blobs or overlapping lines, too low a flow gives gaps.
| Under-extrusion | Over-extrusion | |
|---|---|---|
| Top surface | Visible gaps between lines | Ridges, rough and overfilled |
| Walls | Thin, porous, weak | Bulging, parts oversized |
| Strength | Often poor, layers split | Less affected (Polymaker) |
If your prints show the right-hand column, our guide to over extrusion in 3D printing goes through its causes and the flow test.
The bottom line
3D printing under extrusion is almost always a supply problem: something slows the filament, the hotend cannot melt it fast enough, or the settings ask for too little. Check the spool, the nozzle and the gears first, then the slicer profile, speed and temperature, and calibrate flow last. When gaps appear only at corners, fix pressure advance rather than flow.
Sources
- Bambu Lab Wiki: Under-extrusion, Volumetric speed, Flow rate calibration and A1 extrusion troubleshooting (causes, formula and examples, 5–10 °C)
- Prusa Knowledge Base: Under-extrusion, Extrusion multiplier calibration and Stringing and oozing (causes, ±0.05 mm, 5–15 °C, 0.9–1.1 range)
- E3D: nozzle flow data for the V6, Revo High Flow and Volcano (0.4 mm brass, PLA at 220 °C)
- Polymaker Wiki: Over-extrusion vs. under-extrusion