A clogged 3D printer nozzle shows up as gaps, missing layers, thin or curling extrusion and a clicking extruder. Fix it in escalating order: heat the nozzle and push fresh filament through, run a cold pull with PLA, clear the tip with a thin needle, and replace the nozzle if nothing flows. Then remove the cause, which is often heat creep.
The blockage can sit in the nozzle tip, in the heat break above it or in the tube that feeds it. Our guide to the 3D printer hotend explains how those parts fit together. If the drive gears slip or chew the filament before anything reaches the nozzle, start with our guide to the 3D printer extruder instead.
The short answer
| Step | What to do | Key numbers |
|---|---|---|
| 1. Confirm | Extrude by hand; a clean nozzle gives a straight strand | Strand should not curl (Bambu Lab) |
| 2. Push through hot | Heat, wait, push fresh PLA by hand | 260 °C after PLA, 280 °C after PETG or ASA, 2 minutes (Prusa) |
| 3. Cold pull | Load PLA hot, cool, pull | 220 °C, then pull at 100 °C (Bambu Lab) |
| 4. Needle from below | Clear the hot tip | 0.3–0.35 mm wire, 1–2 cm deep (Prusa) |
| 5. Replace | New nozzle or hotend, tightened hot | 280 °C (Prusa), 285 °C (E3D V6 brass) |
| 6. Prevent | Stop heat creep | Room below 35 °C (Prusa) |
What does a clogged nozzle print look like?
A clogged nozzle print has gaps, thin walls and missing layers, because only part of the planned plastic gets through. Prusa describes a partial clog as one where the printer can still push some filament, but not enough to print the object properly. An early sign is filament that comes out unevenly, curls up and sticks to the nozzle.
Bambu Lab uses the same test: extrude by hand and watch the strand. A clear nozzle gives a straight line, while a partly blocked one curls it sideways.
Listen as well: Prusa links loud clicking from the extruder to a clogged or deformed nozzle, and light clicking to the gearing. A full clog means nothing comes out at all.
Is it a clog or something else?
Several problems look like a clog, so rule them out before taking anything apart.
| What you see | Likely cause |
|---|---|
| Problems on the first layer only, but good flow in free air | Nozzle too close to the bed (Bambu Lab’s test) |
| Filament ground flat by the gears | Extruder grip, or a clog behind it |
| Thin walls only at high speed | Printing faster than the hotend can melt |
| Strand curls or stops in free air | Partial or full clog |
If the first row matches, our guide to first layer problems covers Z offset. Thin walls without clicking are more often a speed or settings issue, covered in our guide to 3D printing under extrusion.
What causes a 3D printer nozzle clog?
A 3D printer nozzle clogs when something solid gets into a bore that is only a fraction of a millimeter wide, or when filament softens too early and swells above the melt zone. Bambu Lab and Prusa list the same main causes:
- Heat creep. Heat climbs above the melt zone and softens filament inside the heat break, most often with PLA in a warm enclosure.
- Debris and burnt residue carried to the tip from the filament or from old, cooked plastic.
- Particles in special filaments: Bambu Lab names carbon fiber, glow-in-the-dark and sparkling filaments.
- Unpurged material changes, such as PC left in the nozzle before PLA.
- Oversized filament, thicker than the nominal 1.75 mm.
- Wet or degraded filament, or a damaged PTFE tube inside the hotend, which Prusa names for its MINI.
- The wrong temperature: too cool to flow, or hot enough to creep upward.
Abrasive fillers also wear soft brass nozzles; hardened nozzles fix that, as our extruder guide explains.
How to unclog a 3D printer nozzle, step by step
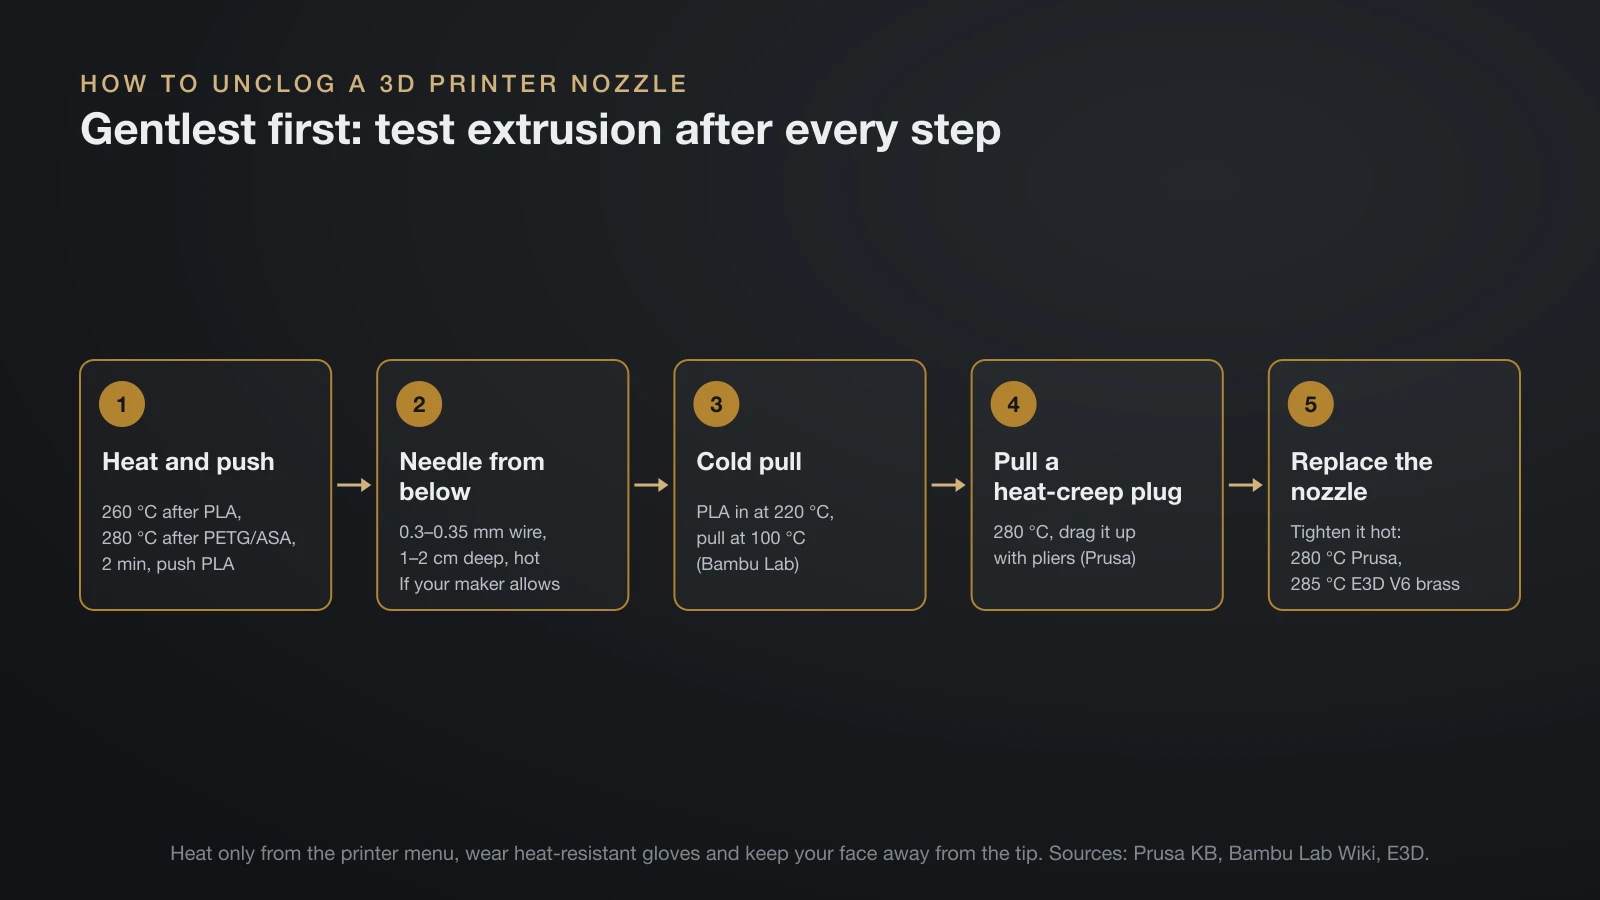
Work from the gentlest method to the most invasive, and test extrusion after every step so you stop as soon as the strand comes out straight. The nozzle runs at printing temperature for most of this, so heat it only from the printer’s menu, wear heat-resistant gloves and keep your face away from the tip. Bambu Lab warns that pressure trapped behind a clog can release suddenly and spray hot plastic.
Step 1: Heat up and push filament through
Prusa’s method that works on every nozzle type is heat plus fresh filament. Set the nozzle to 260 °C (500 °F) if the last material was PLA, or 280 °C (536 °F) after higher-temperature materials such as PETG or ASA. Wait 2 minutes at temperature, open the extruder idler and push about 40 cm of PLA in by hand.
Bambu Lab does the same on the A1 series with the load button, at a temperature slightly above the filament’s normal setting, for example 250 °C (482 °F) for PLA. If a straight strand appears, the clog has probably cleared; confirm with a small test print.
Step 2: Clear the tip with a needle
Prusa inserts an acupuncture needle or a 0.3–0.35 mm wire into the hot nozzle from below, about 1–2 cm deep, then loads filament again, repeating several times. Bambu Lab moves its pin through the tip at 250 °C, but not far, since that can push molten plastic higher. It skips the pin on nozzles smaller than 0.4 mm.
Not every maker agrees: E3D says never to use needles or steel wire brushes on its V6 nozzles, and coated nozzles such as Nozzle X take only cleaning filament.
Step 3: Run a cold pull
If the strand is still uneven, a cold pull removes residue that pushing cannot. Full temperatures and steps are in the next section.
Step 4: Pull a heat-creep plug from the top
When filament has swollen inside the heat break, pushing from above rarely works. Prusa’s method heats the hotend to 280 °C, grips the visible filament with needle-nose pliers and drags it upward bit by bit.
Bambu Lab’s X1 and P1 method removes the hotend, heats a 1.5 mm hex key with a lighter for 10–15 seconds and pushes it into the top of the heatsink. After about 30 seconds the key is set in the plastic; warm the nozzle tip with an ordinary lighter for about 20 seconds and pull the plug out in one piece. Never use a butane torch, and follow either method with a cold pull.
Step 5: Replace the nozzle or hotend
Replace the nozzle when nothing clears it, or when it is worn or bent. Screw-in nozzles such as E3D’s V6 must be tightened hot, because a nozzle tightened cold can leave a gap where plastic escapes.
- Prusa MK3 family: heat to 280 °C and hold the heater block with a 17 mm spanner while turning the nozzle with a 7 mm one. Prusa’s technicians use 2.5 N·m and leave about 0.5 mm between nozzle and block.
- E3D V6: heat brass nozzles to 285 °C (545 °F), wait a minute, then tighten to 2 N·m; more force can shear the nozzle or heat break.
- Bambu Lab X1 and P1: the nozzle and hotend swap as one unit; the replacement steps are in our hotend guide.
Recalibrate the first layer after any nozzle change. Nozzle sizes and hardened nozzles are a separate choice from clearing a clog.
How to do a cold pull (with temperatures)
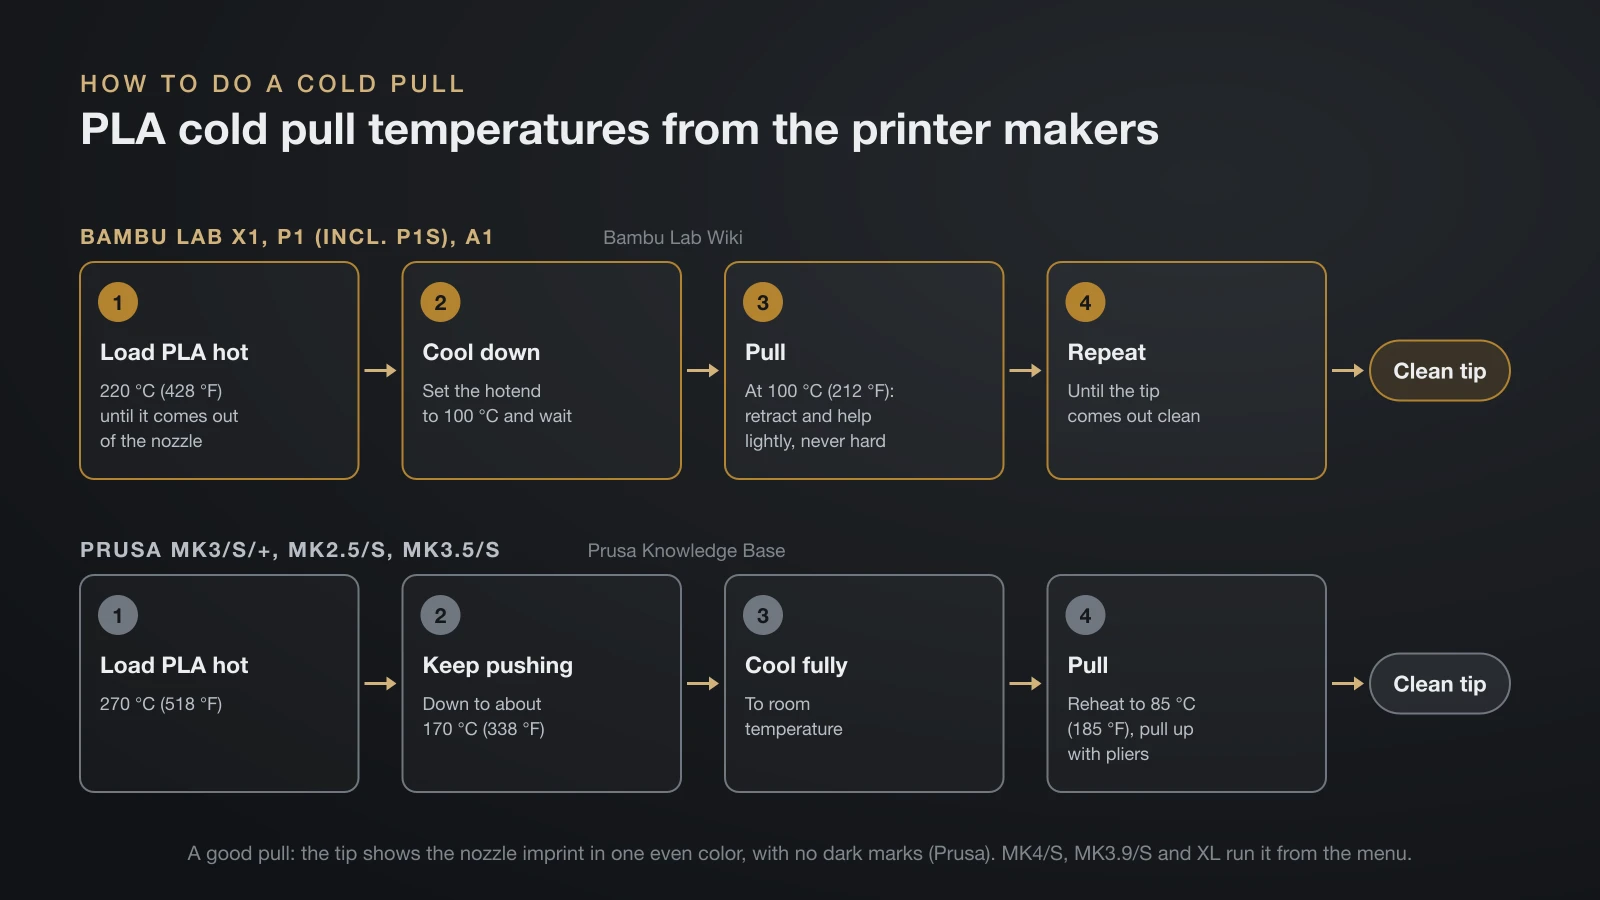
A cold pull loads filament hot, cools it until it is solid but still slightly soft, and pulls it out so the tip brings the dirt with it. Prusa says PLA works best, because other filaments tear or melt too much instead of keeping the shape of the nozzle. Dedicated cleaning filaments also work, and Prusa says not to cold pull a Nozzle X at all.
| Printer | Load PLA at | Then | Pull at |
|---|---|---|---|
| Bambu Lab X1, P1 (incl. P1S) | 220 °C (428 °F) | Set the hotend to 100 °C | 100 °C (212 °F), retract and help lightly |
| Bambu Lab A1, A1 mini | 220 °C | Cool once fresh filament comes out | 100 °C |
| Prusa MK3/S/+, MK2.5/S, MK3.5/S | 270 °C (518 °F) | Push until about 170 °C (338 °F), cool to room temperature | 85 °C (185 °F), with pliers |
| Prusa MK4/S, MK3.9/S, XL | Automatic from the menu | Printer heats and cools | By hand when prompted |
The pull temperatures are low on purpose. Bambu Lab picks 100 °C so the PLA is soft enough to leave the hotend but firm enough to hold together.
How to cold pull on a Bambu Lab P1S
These steps follow Bambu Lab’s X1 and P1 guide, so they also cover the P1S cold pull:
- Open the path. Remove the print head’s front cover, loosen the screws beside the PTFE tube support, push the support and pull the tube out upward.
- Load hot. Set the hotend to 220 °C (Settings, Temperature/Axis) and feed PLA until it comes out of the nozzle.
- Cool. Set the hotend to 100 °C and wait.
- Pull. Press retract and gently help the filament up; never pull hard against the gears.
- Repeat and refit. Repeat until the tip is clean, then refit the tube with its support raised as high as it goes.
What a good cold pull looks like
A successful pull ends in a tip with the imprint of the nozzle and one even color, with no dark marks or traces of the previous material, according to Prusa. If the tip is dirty, repeat the pull; a few rounds are normal.
Heat creep: how to stop clogs from coming back
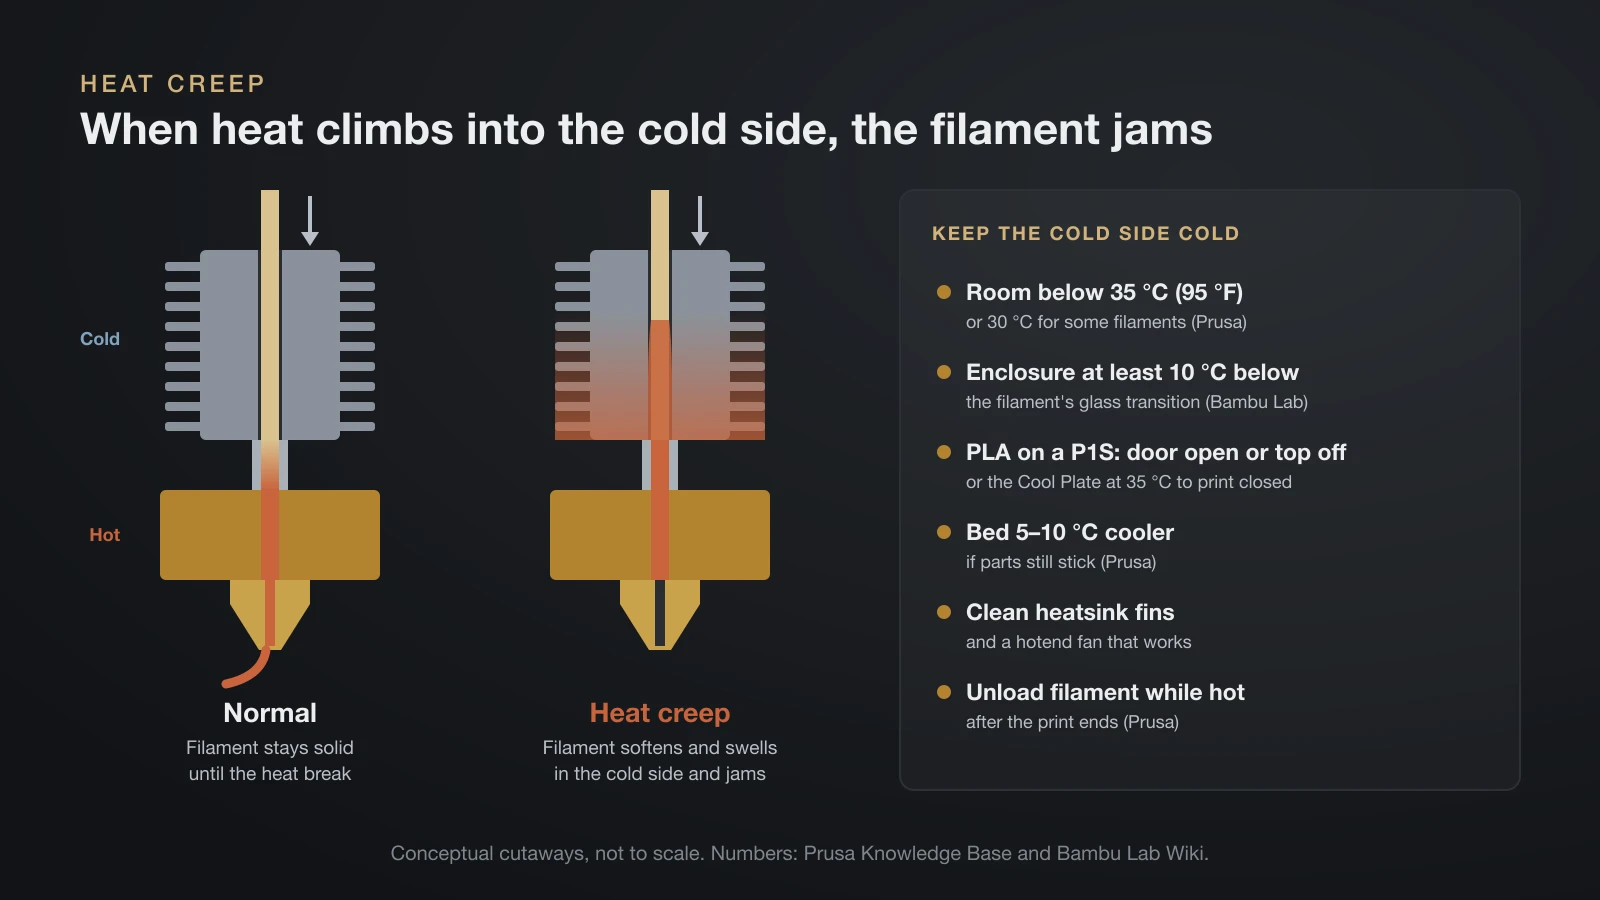
Heat creep is a clog that forms above the nozzle: heat climbs into the cold side of the hotend, filament softens and swells there, and the extruder can no longer push it. Bambu Lab says it most often hits PLA and TPU, which soften at low temperatures, and PETG when an enclosure gets too warm. A print can start normally and develop a partial clog later, once the heatsink has warmed up.
Prevention comes down to keeping the cold side cold:
- Room below 35 °C (95 °F), or 30 °C for some filaments (Prusa).
- Enclosure at least 10 °C below the filament’s glass transition temperature (Bambu Lab); our PLA temperature guide lists PLA’s.
- Bambu Lab P1S: print PLA on the textured PEI plate (bed 55 °C) with the door open or top cover off, or use the Cool Plate at 35 °C to print closed.
- Bed 5–10 °C cooler if parts still stick (Prusa).
- Clean heatsink fins and a working hotend fan that blows into the heatsink.
- Thicker layers or slightly faster printing, so more plastic moves through: Prusa suggests 0.15 or 0.20 mm layers, or about 10% more speed.
- Unload filament while the hotend is still hot after a print (Prusa).
Other habits that prevent clogs
- Purge at the hotter temperature: Prusa loads PLA at the PETG temperature after printing PETG.
- Keep filament clean and dry, stored sealed with desiccant.
- Match the nozzle to filled filaments: Prusa says wood-filled composites may need at least a 0.6 mm nozzle, and carbon or Kevlar fiber needs a hardened one.
- Check the tube for kinks or broken pieces, especially on Bowden printers; see direct drive vs Bowden extruders.
The bottom line
A clogged 3D printer nozzle usually clears with heat and fresh PLA, a cold pull and, where the maker allows it, a thin needle from below. Use the temperatures from your printer’s maker, such as 220 °C and 100 °C on Bambu Lab’s X1, P1 and A1, and replace the nozzle only when nothing flows. Then fix the cause: a cool heatsink, a ventilated enclosure for PLA and clean, dry filament stop most clogs from coming back.
Sources
- Prusa Knowledge Base: Clogged nozzle (MK4, XL, CORE One), Clogged nozzle (MINI), cold pull for the MK3 family and MK4 family, Heat creep, Changing the nozzle and Under-extrusion
- Bambu Lab Wiki: nozzle clog guides for the X1 and P1 and A1 series, Which part is clogged and Heat creep
- E3D: V6 nozzle support (hot tightening, cleaning methods)