Input shaping in 3D printing is a firmware feature that cancels the vibrations that cause ghosting, the faint echoes that repeat after sharp edges on a print’s walls. The printer measures its frame’s resonance frequency, then shapes each motion command so the vibration it starts is canceled by the next part of the move. The result is cleaner walls at higher acceleration.
It works best on a printer that is mechanically sound. Loose belts, a wobbly frame or a heavy print head cause the same echoes, and firmware can only hide so much of that. Our guide on how to calibrate a 3D printer puts the hardware check first for this reason, and this guide follows the same order: diagnose, fix the mechanics, tune, then verify.
The short answer
| Question | Answer |
|---|---|
| What is ghosting? | Ripples that repeat after corners and edges, also called ringing or echoing |
| Main cause | Frame and belt vibration when the print head changes direction quickly |
| Check first | Belt tension, loose screws and pulleys, a firm printer surface |
| Firmware fix | Input shaping: Klipper (several shaper types), Marlin 2.1.2+ (ZV, zero vibration), Prusa and Bambu Lab (built in) |
| How to tune | Accelerometer if you have one; otherwise a printed ringing tower |
| Fix without firmware | Lower acceleration and outer wall speed |
3D print ghosting: what ringing looks like
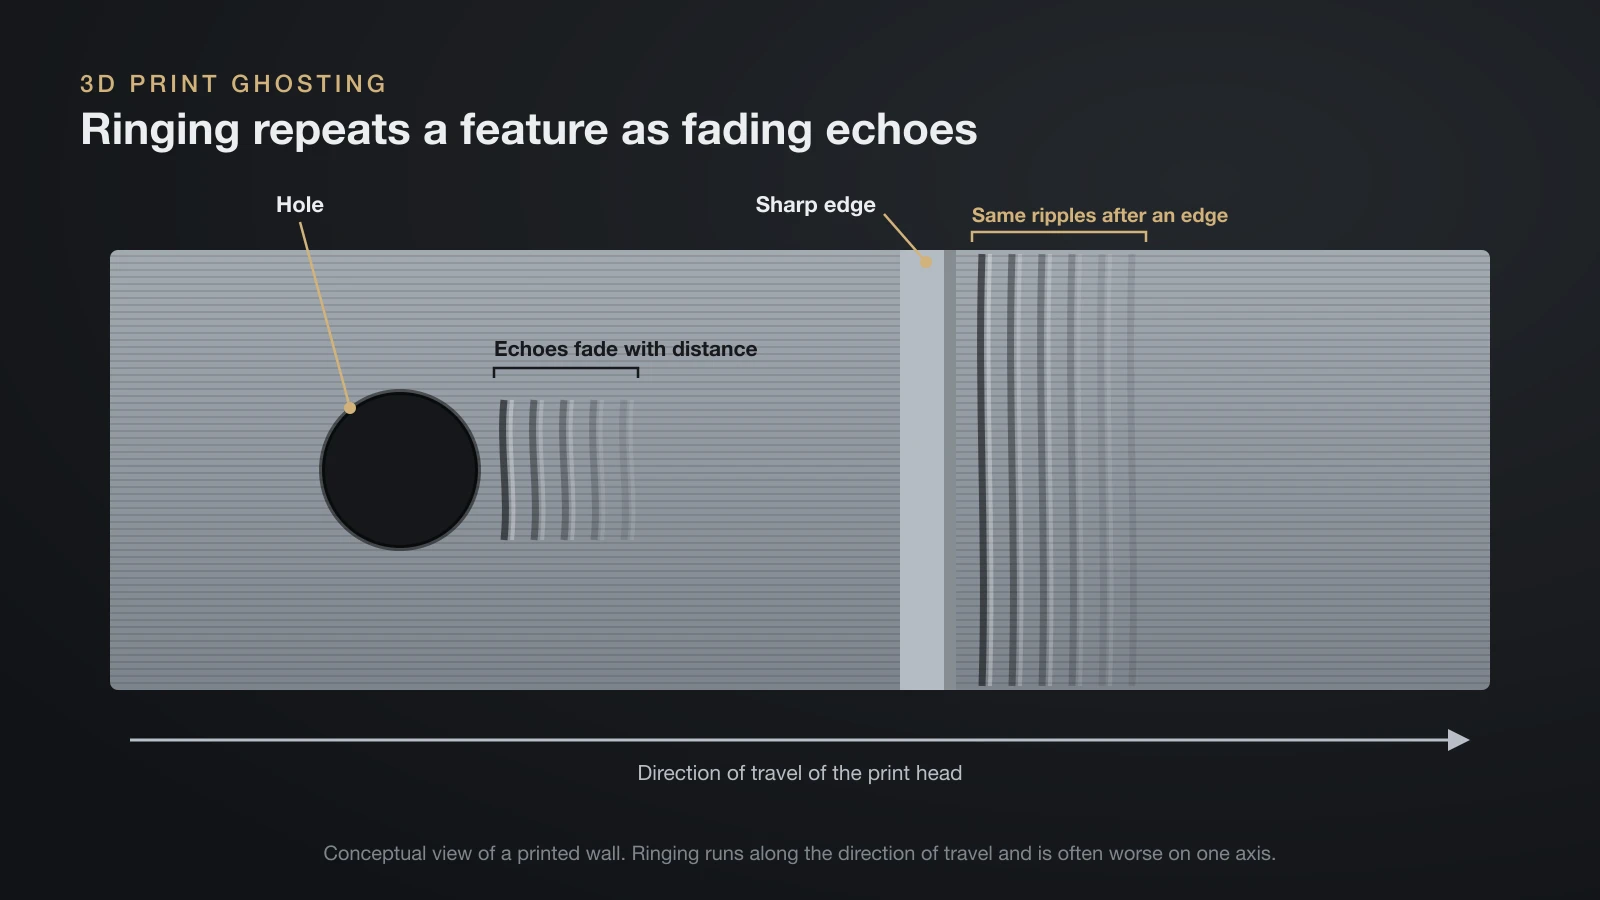
3D print ghosting is a surface defect where an edge or feature repeats itself as a faint echo a few millimeters further along the wall. Klipper’s documentation lists ringing, echoing, ghosting and rippling as names for the same thing. Prusa describes it as several waves that follow a sharp edge, and a lettered logo or a hole on a flat wall shows it most clearly.
Ghosting always runs along the direction of travel and fades with distance from the feature that started it. A 3D printer ghosting problem is usually worse on one axis than the other, because each axis has its own resonance frequency.
Is it ghosting or something else?
Not every wavy wall is ringing, so rule out lookalikes before you tune anything. Klipper’s test tower is shaped so that true ringing follows the curved notches; if the pattern doesn’t, Klipper says the defect has a mechanical or extruder origin that input shaping won’t fix.
| What you see | Likely cause |
|---|---|
| Echoes that fade out after corners and features | Ringing (ghosting) |
| Fine, evenly spaced vertical lines across whole walls | Vertical fine artifacts (VFA), mostly motor resonance at certain speeds, per OrcaSlicer; input shaping only partly helps |
| Regular horizontal bands every few layers | A Z-axis or extrusion problem, not ringing |
| Bulging or thin corners | Pressure advance, not ringing |
What causes ghosting and ringing?
Ghosting is caused by mechanical vibration in the printer when the print head changes direction quickly. Klipper names the usual mechanical sources, and says to check and fix them before enabling input shaping:
- A frame that isn’t rigid enough flexes and keeps swinging after each move.
- Loose or springy belts let the carriage oscillate. Prusa’s ghosting fix for its MK3 and MINI printers starts with belt tension.
- Misaligned mechanical parts, such as a pulley set screw that has backed off.
- Heavy moving mass. A heavier print head lowers the resonance frequency; our comparison of direct drive vs Bowden extruders covers why head weight matters.
- High speed and acceleration. Prusa notes that the vibrations grow with print speed, so ghosting can appear even with correctly tensioned belts.
Bed-slinger printers, where the bed moves on one axis, add another variable. Klipper points out that the bed’s mass grows as filament is deposited, which lowers its resonance frequency during a print. Size matters too: taller frames and longer gantries on large 3D printers move more mass over longer spans.
How input shaping works
Input shaping is an open-loop control technique that creates a motion command designed to cancel its own vibrations, in Klipper’s words. Every printer axis has a resonance frequency at which it rings most. Once the firmware knows that frequency, it splits each acceleration into timed pulses so the vibration started by one pulse is canceled by the next.
Klipper lists side benefits: input shaping usually reduces the printer’s shaking in general. It has almost no effect on print time by itself; the acceleration limit you set afterward decides that.
There is a trade-off. Shapers that tolerate more error also smooth the motion more, which can round sharp corners and blur fine detail at high acceleration. Choosing a shaper is therefore a balance between vibration reduction and smoothing.
Input shaper types: ZV, MZV, EI and more
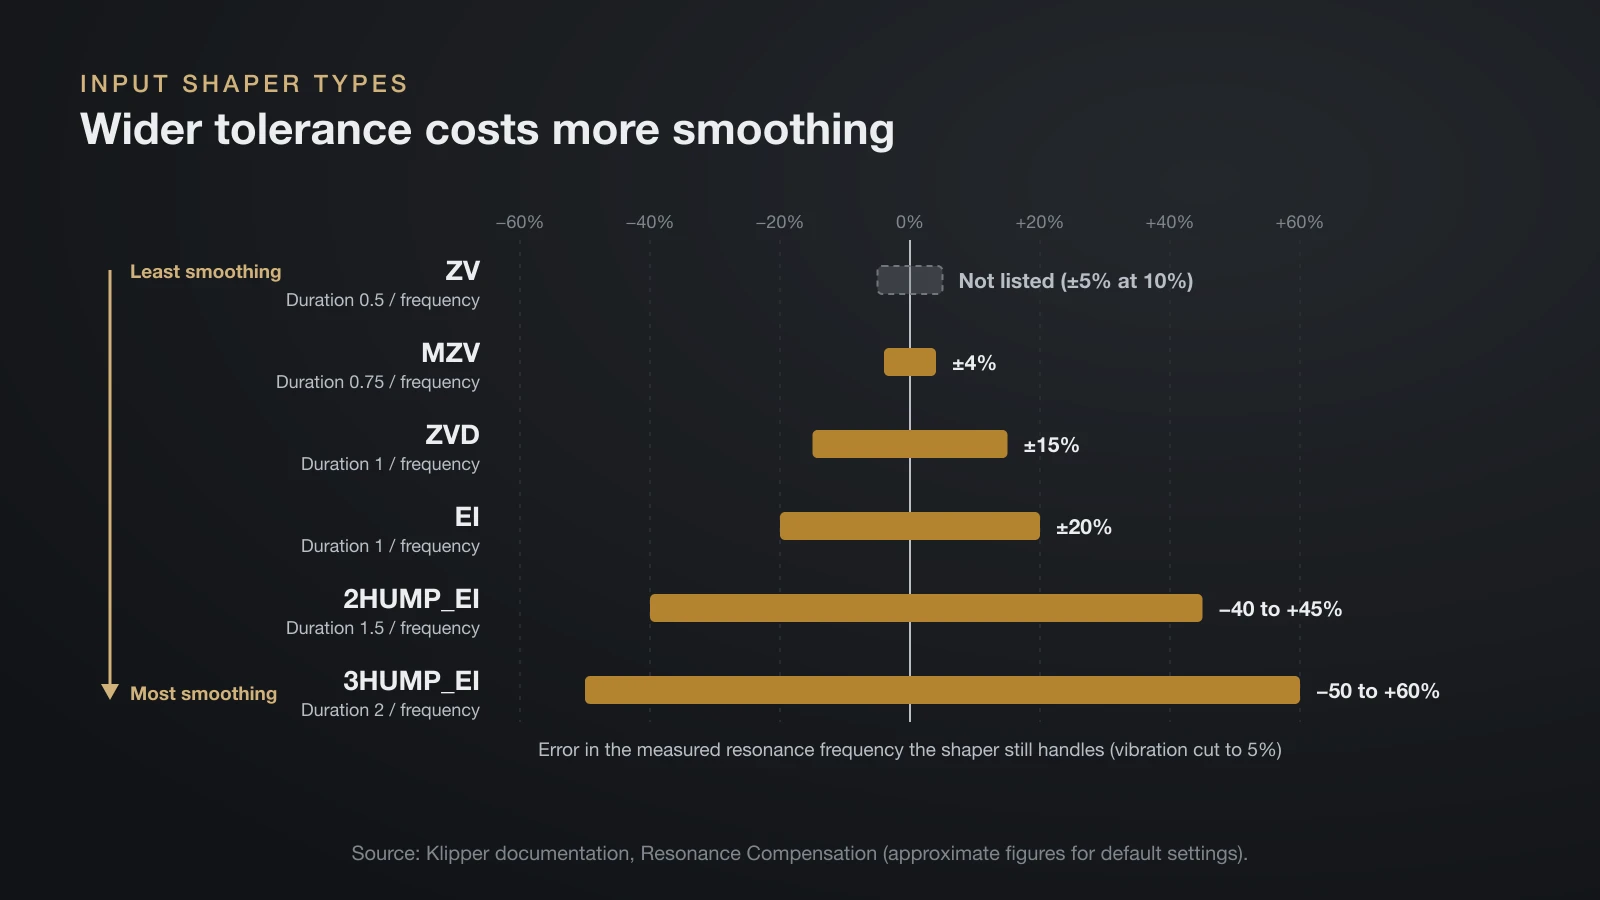
Klipper supports six input shapers that differ in how much error in the measured frequency they tolerate and how much smoothing they add. The table uses Klipper’s approximate figures for its default settings.
| Shaper | Duration | Frequency error tolerated (vibration cut to 5%) | Klipper’s notes |
|---|---|---|---|
| ZV | 0.5 / frequency | Not listed (±5% at 10%) | Least smoothing, most sensitive to measurement errors |
| MZV (modified ZV) | 0.75 / frequency | ±4% | Between ZV and ZVD; works well on many printers |
| ZVD | 1 / frequency | ±15% | More tolerance than MZV, more smoothing |
| EI | 1 / frequency | ±20% | More robust; may suit bed slingers and delta printers |
| 2HUMP_EI | 1.5 / frequency | −40 to +45% | For several resonances at once |
| 3HUMP_EI | 2 / frequency | −50 to +60% | Widest range, most smoothing |
Klipper’s recommendation for most printers is MZV or EI: print a test with each and keep EI only if it looks clearly better. If the ringing frequency is very low, around 25 Hz or less, even MZV may smooth too much, and Klipper suggests trying ZV instead.
How to set up input shaping on your printer
Setting up input shaping means measuring each axis’s resonance frequency, entering it with a shaper type, then choosing a maximum acceleration that avoids too much smoothing. How you measure depends on the firmware.
Klipper with an accelerometer
Klipper supports ADXL345, MPU-9250, LIS2DW and LIS3DH compatible accelerometers. The sensor is mounted on the toolhead, and on a bed slinger a second measurement is taken with it on the bed. Klipper warns that the mount must keep the sensor electrically isolated from the frame, since a ground loop can damage the electronics.
SHAPER_CALIBRATE then runs the resonance test and recommends a shaper type, frequency and a suggested maximum acceleration for each axis.
Klipper without an accelerometer: the ringing tower
Klipper’s manual method prints its ringing_tower.stl test model and measures the echoes. Slice it with a 0.2–0.25 mm layer height, 1–2 perimeters or vase mode, no infill or top layers, 80–100 mm/s outer walls and a minimum layer time of 3 seconds at most.
- Disable pressure advance and any existing shaper, and reset
square_corner_velocityto 5. - Run
TUNING_TOWER COMMAND=SET_VELOCITY_LIMIT PARAMETER=ACCEL START=1500 STEP_DELTA=500 STEP_HEIGHT=5, which raises acceleration every 5 mm from 1,500 toward 7,000 mm/s². - On the side with the X mark, measure distance D across N oscillations.
- Calculate frequency = speed × N ÷ D. Klipper’s example: 100 × 6 ÷ 12.14 ≈ 49.4 Hz.
- Repeat for Y, enter both in
[input_shaper], then compare MZV and EI prints.
If the frequency comes out below about 20–25 Hz, Klipper suggests stiffening the printer or reducing moving mass before tuning further.
Marlin input shaping (M593)
Marlin added ZV input shaping in version 2.1.2, configured with M593 and saved with M500. The firmware must be compiled with INPUT_SHAPING_X and INPUT_SHAPING_Y. Marlin provides no accelerometer tuning; its guide uses printed tests instead.
- Frequency sweep: a zigzag pattern printed with increasing speed; Marlin’s example breaks at 62 mm, which gives 62 ÷ 2 = 31 Hz, set with
M593 X F31. - Ringing tower: a vase-mode tower that steps through 15–60 Hz by layer; you pick the cleanest height and read off its frequency.
Marlin notes that the sweep runs with linear advance off, so recheck the K factor afterward.
Prusa and Bambu Lab printers
Prusa’s CORE One, MK4S, MK3.9S, MK3.5S, XL and MINI have Input Shaper, and Prusa says it is pre-calibrated at the factory, so a stock printer usually needs no tuning. The CORE One L and XL have a built-in accelerometer; an optional one serves the others after hardware changes. Prusa asks for tight X and Y belts, a nozzle in good shape and clean rods first.
Bambu Lab calls its version vibration compensation. It is part of the printer’s calibration routine, and Bambu Lab says to rerun it after moving the printer, after firmware updates or belt tensioning, after changing hardware and when quality drops.
For Klipper or Marlin machines without a sensor, OrcaSlicer has a built-in input shaping calibration that prints a ringing tower across a default 15–110 Hz range, followed by a damping test. Our OrcaSlicer vs Bambu Studio comparison covers the rest of its calibration tools.
How to fix ghosting without input shaping
You can reduce ghosting without firmware support by removing the vibration at its source and by asking the printer to accelerate less violently. Work through these in order:
- Tension the belts. Prusa’s test: pluck the belt like a guitar string; a tight belt gives a deep bass tone. Some printers report belt status in the menu.
- Tighten pulley set screws and frame bolts. Klipper lists alignment issues of mechanical parts among the mechanical causes of ringing.
- Put the printer on a firm surface. Prusa’s general advice for ghosting is a firm base, and our 3D printer table guide shows how to size and steady one.
- Lower outer wall acceleration and speed. Prusa’s first software fix is to reduce print speed, and Klipper’s test tower raises acceleration to make ringing worse, so lowering it helps. Our 3D printing slicer settings guide shows where speed limits live.
- Reduce moving mass where you can, such as a lighter fan duct.
- Brace the frame on printers with a tall, open gantry.
Test each change with the same model so you can see what helped.
Do anti-vibration feet fix ghosting?
Anti-vibration feet mainly protect the table and nearby machines, not the print surface. Bambu Lab’s product page for its X1 and P1 feet says they cut desk shaking from a single printer and reduce the effect of vibration from neighboring printers. It also lists a downside: the printer can oscillate on the rubber, which Bambu Lab says has no effect on printing.
On a printer with vibration compensation, run the calibration again after fitting feet or moving the machine, because Bambu Lab ties that routine to the surface the printer stands on. Prusa’s advice runs the other way, favoring a firm surface, so check your printer maker’s guidance before adding soft feet.
Input shaping 3D printing checklist
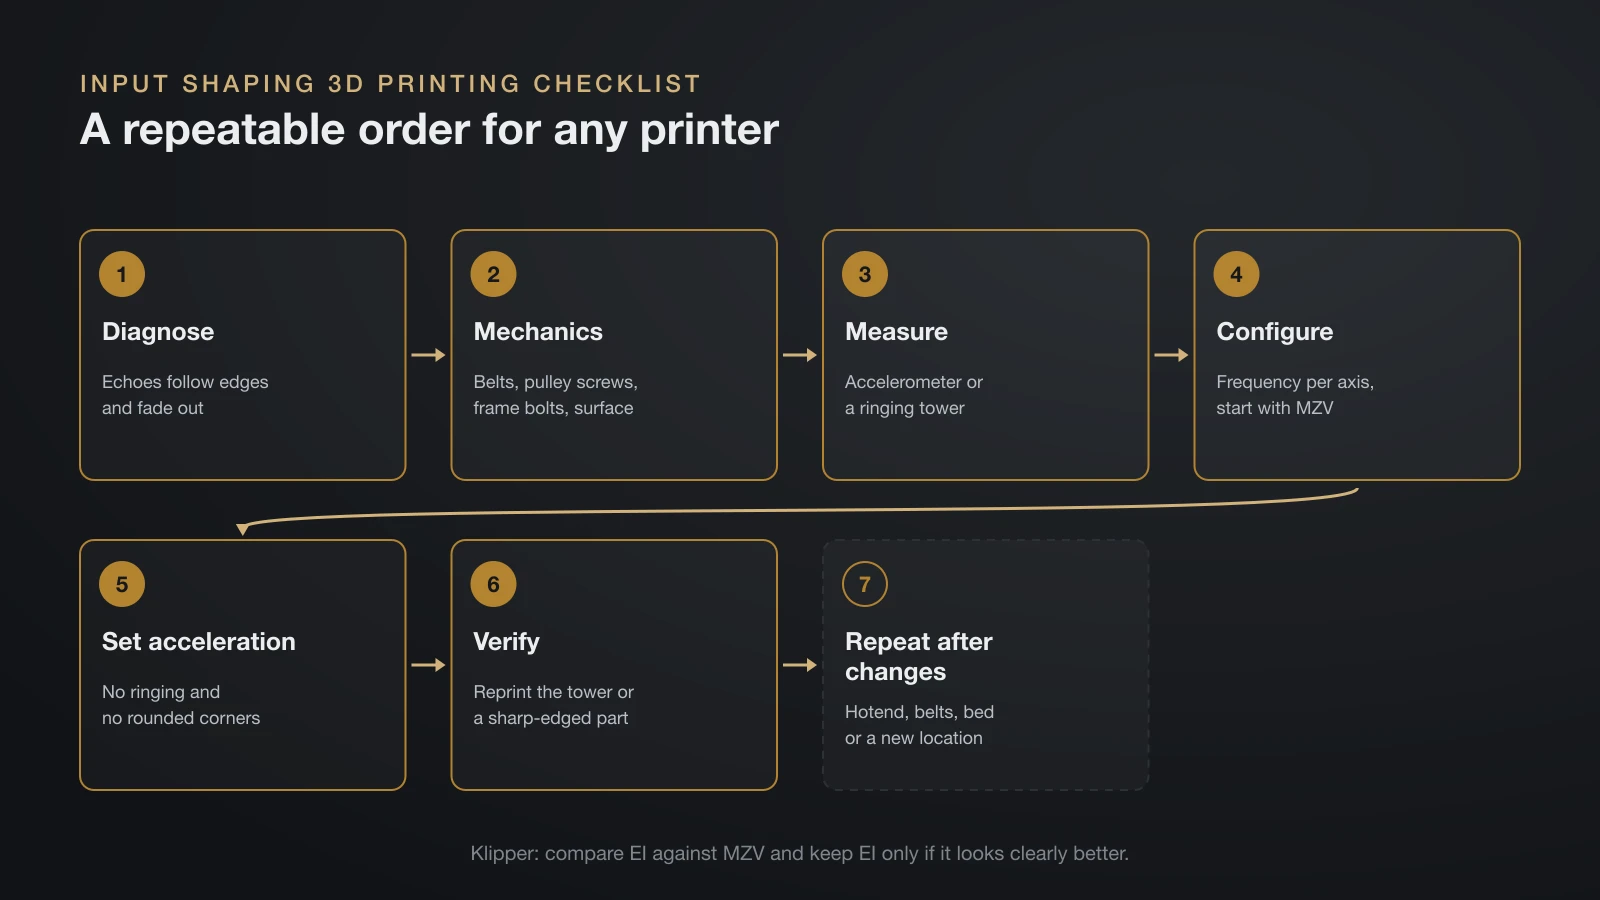
Use this checklist as a repeatable order for any printer, from a stock Ender 3 to a Klipper CoreXY.
- Diagnose: echoes follow edges and fade; not VFA, banding or corner bulges.
- Mechanics: belts tensioned, pulley screws tight, frame bolts snug, firm surface.
- Measure: accelerometer (
SHAPER_CALIBRATE, Prusa or Bambu Lab routine) or a ringing tower. - Configure: frequency per axis, shaper type (start with MZV, compare EI on Klipper).
- Set acceleration: the highest value that shows neither ringing nor rounded corners.
- Verify: reprint the tower or a part with sharp features and lettering.
- Repeat after changes: new hotend or extruder, belt adjustments, a new bed or a new location.
The bottom line
Ghosting comes from the printer’s own vibration, so start with tight belts, secure pulleys and a stable frame. Input shaping then cancels the remaining resonance: Klipper offers the widest choice of shapers, Marlin 2.1.2 and later adds ZV, and Prusa and Bambu Lab printers calibrate it themselves. Tune with an accelerometer or a ringing tower, pick the highest acceleration that keeps corners sharp, and recalibrate whenever the hardware changes.
Sources
- Klipper documentation: Resonance Compensation (causes of ringing, ringing tower procedure and formula, shaper table and recommendations, print time) and Measuring Resonances (supported accelerometers, mounting, bed slingers, SHAPER_CALIBRATE)
- Marlin documentation: M593 ZV Input Shaping (version, configuration options, frequency sweep and ringing tower tuning)
- Prusa Knowledge Base: Input Shaper (supported printers, factory calibration, integrated accelerometers, maintenance) and Ghosting (belt tension, speed, firm surface)
- Bambu Lab: Wiki Printer Calibration Guide (vibration compensation and when to rerun it) and US Store Anti-Vibration Feet (purpose and downsides)
- OrcaSlicer Wiki: Input Shaping calibration and VFA (test ranges, damping, recalibration interval, vertical fine artifacts)