3D printed molds let you cast silicone, resin, plaster, wax, soap, metal and even injection-molded plastic without machining tooling. The most common home route is to print a master and a mold box, pour silicone around the master, then cast resin copies in the cured silicone. A print can also be the mold itself or a metal casting pattern.
The right route depends on what you pour, how hot it gets and how many copies you need. If you want the finished part itself to be silicone, our guide on whether you can 3D print silicone covers printed silicone and TPU.
The short answer
| Route | What you print | What you cast | Print it in | Main pitfall |
|---|---|---|---|---|
| Silicone mold from a printed master | The part (master) plus a mold box | Resin, plaster, wax, soap | Resin or FDM, sanded and sealed | Cure inhibition of platinum silicone |
| Direct printed mold | The hollow mold cavity | Silicone, plaster, soap, wax | FDM or clear resin | Layer lines copy onto the cast; heat |
| Sand casting pattern | The part plus gates, vents and shrink allowance | Metal, in a sand mold | FDM or resin | Draft and shrinkage allowance |
| Lost PLA (investment casting) | A burnout pattern | Metal, in a ceramic shell | Castable filament or resin | Clean burnout, foundry safety |
| Injection mold insert | Two mold halves | Thermoplastics such as PP, PE and TPE | Heat-resistant SLA resin | Short mold life |
For most home projects, start with the first route: it needs no special printer, and the silicone mold tolerates hotter materials than the print itself.
How 3D printed molds work: master vs mold
Every mold project starts with one decision: print the positive shape and mold around it, or print the negative cavity directly. A master (or pattern) looks like the finished part; a mold is its hollow negative.
A printed master suits detailed parts, because you can sand and polish it before molding; a printed cavity copies every layer line onto the part.
- One-part (open) molds: a single cavity open at the top, fine for flat-backed parts such as tiles, soap bars and badges.
- Two-part molds: two halves meeting at a parting line, with registration keys, a pour channel and air vents.
Prusa’s mold-making guide says any non-porous print can be a master, but layer lines show on the cast, so it calls resin printing more suitable; our comparison of resin vs filament printers explains the difference in finish.
How to make a silicone mold from a 3D printed master
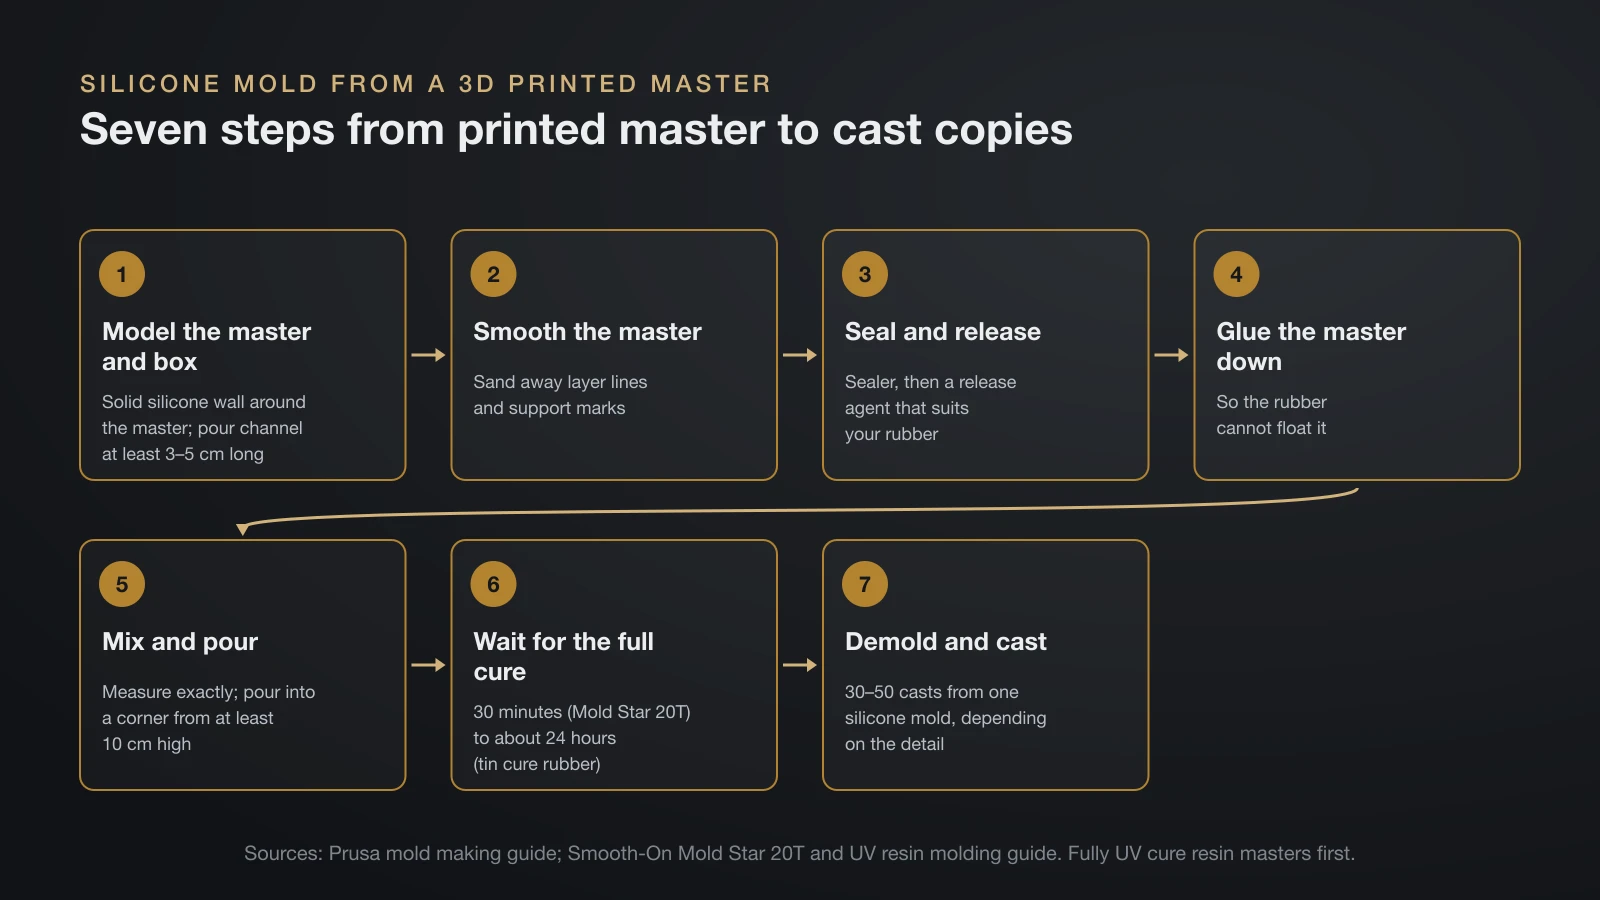
To make a silicone mold from a 3D print, you print the master and a box around it, then fill the box with two-part mold rubber. This 3D print silicone mold route works on any printer.
- Model the master and the box. Leave room for a solid silicone wall around the master. In Prusa’s guide, a shell with 4 perimeter walls was sturdy enough. Plan a pour channel at least 3–5 cm long: 3 cm wide for plaster, concrete or wax, 1 cm for most others.
- Smooth the master. Sand away layer lines and support marks; our guide on how to paint 3D prints covers grit steps and filler primer.
- Seal and release. For resin masters, Smooth-On recommends XTC-3D epoxy coating or Krylon Crystal Clear gloss acrylic as sealers, with Ease Release 200 on top. Its chart pairs each rubber with a sealer and release combination.
- Glue the master down so the rubber cannot float it.
- Mix and pour. Measure exactly as the data sheet says. Prusa pours into a corner of the box from at least 10 cm high and lets the rubber flow into every recess on its own.
- Wait for the full cure. Mold Star 20T cures in 30 minutes; the tin cure rubber in Prusa’s guide took about 24 hours.
- Demold and cast. Prusa reports 30–50 casts from one silicone mold, depending on the detail.
In Prusa’s examples, soap set in 1–3 hours and wax in 30–60 minutes; polyurethane, epoxy, plaster, concrete and low-melting alloys also work.
Cure inhibition: when silicone will not cure on a print
Cure inhibition means a contaminant on the master stops the silicone from curing, leaving it tacky or liquid at the surface. Platinum cure silicones are the sensitive type. Smooth-On warns that latex, sulfur clays, certain woods and freshly cast polyester, epoxy or urethane can inhibit Mold Star 20T, and that it will not cure against sulfur even over a sealer.
Resin prints are the classic trap. Smooth-On says its platinum silicones work against most SLA prints only once they are fully UV cured:
- Dip the print in 91% isopropyl alcohol while wearing gloves, wash it with dish soap and water, and let it dry.
- UV cure it for at least 6 hours, turning it so light reaches every surface, including deep recesses.
- Use clear or translucent resin; Smooth-On advises against opaque resin for molds because light cannot cure the inside.
Tin cure silicone is far less likely to be inhibited by resin prints, but it must be weighed and vacuum degassed. Test a small batch on a hidden spot of the master first.
Printing the mold itself: resin, plaster, soap and wax
You can skip the master and print the negative cavity, then fill it with silicone, plaster, soap or wax. A printed mold saves a step and can hold inserts or text exactly where CAD put them. Formlabs describes four ways to cast silicone in printed molds:
| Technique | How it works | Reuse |
|---|---|---|
| Compression molding | Silicone is pressed between two rigid halves | Dozens of casts; no undercuts |
| Injection filled molding | Silicone is injected through a fill gate | Dozens of casts; minor undercuts |
| Overmolding | Silicone is cast around hardware held in the mold | Dozens of casts |
| Eggshell molding | A shell under 1 mm thick is broken away | Single use; large undercuts |
Formlabs recommends clear resin, so you can watch the silicone flow, and 50 micron (0.05 mm) layers. A rigid mold cannot flex, so undercuts lock the part in unless the mold splits around them.
Heat is the other limit. Casting resins heat up as they cure: Smooth-On warns that a concentrated mass of its mixed EpoxAmite HT epoxy can get hot enough to melt a plastic cup. Thick resin pours, hot wax and melted soap can all soften a PLA mold.
Food molds: print the master, not the mold
Do not use a printed part as a food mold. Prusa does not recommend PLA, or any other filament, for items in direct contact with food, because bacteria can grow in the grooves between layers.
Cast a food-grade silicone mold over a printed master instead. Smooth-On lists Smooth-Sil 940, 950 and 960, some Sorta-Clear silicones and its Equinox series as food grade, with ingredients that comply with FDA regulation 21 CFR 177.2600 for rubber articles intended for repeated use. Check the exact product’s data sheet before it touches food.
Best material for 3D printed molds
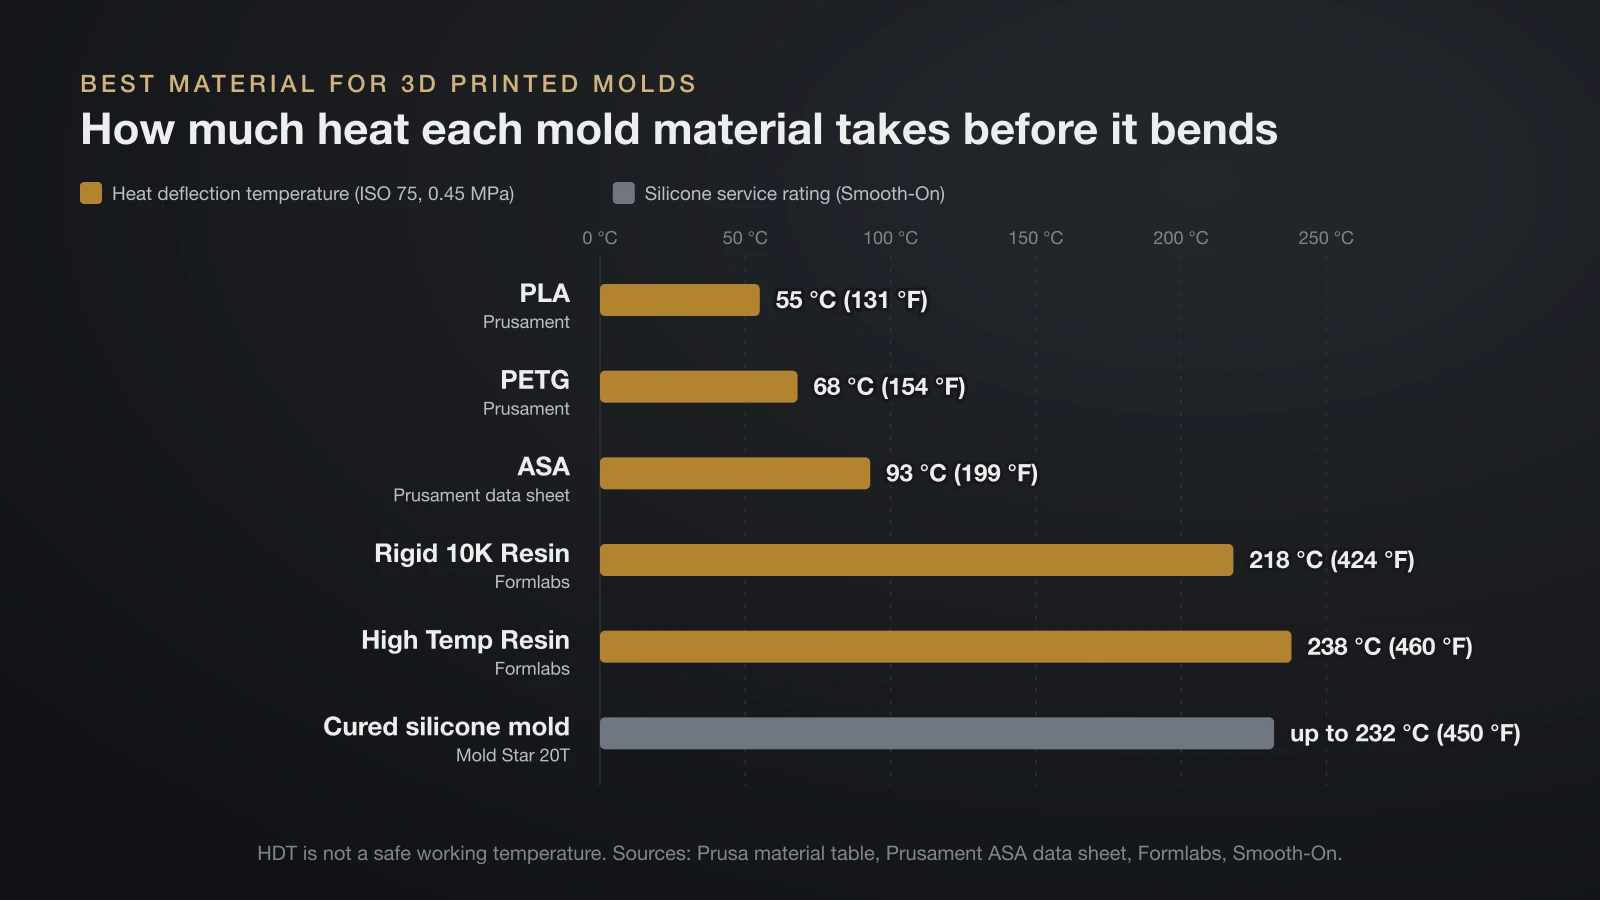
The best material for a 3D printed mold is one whose heat limit sits well above the temperature of whatever you pour into it. The usual comparison is heat deflection temperature (HDT): the point where a test bar bends under a light load (ISO 75, 0.45 MPa).
| Material | Heat deflection (0.45 MPa) | Good for |
|---|---|---|
| PLA (Prusament) | 55 °C (131 °F) | Mold boxes and masters for room-temperature silicone |
| PETG (Prusament) | 68 °C (154 °F) | Molds in a warm room or with mild heat |
| ASA (Prusament data sheet) | 93 °C (199 °F) | Warmer pours; see our ASA filament guide |
| Formlabs Rigid 10K Resin | 218 °C (424 °F) | Injection mold inserts |
| Formlabs High Temp Resin | 238 °C (460 °F) | Inserts at higher molding temperatures |
HDT is not a safe working temperature: a mold under the weight of a pour starts to creep below it. Our guides to PLA print temperature and PETG temperature settings explain why prints soften so far below the nozzle temperature.
Smooth-On rates cured Mold Star 20T silicone for use up to 232 °C (450 °F). If your casting material is too hot for PLA, make a silicone mold from the print instead of pouring into the print.
3D printing for metal casting: sand casting and lost PLA

In hobby metal casting, a plastic print is the pattern that shapes the mold; it never holds the molten metal itself. The two routes are sand casting and investment casting, called lost PLA when the pattern is printed. Industrial binder jetting machines go further and print the sand mold directly.
Sand casting with 3D printed patterns
For sand casting, the printed pattern is packed in casting sand and pulled out, and the empty impression is filled with metal. Patterns were traditionally wood, foam, plastic or wax.
A pattern is not an exact copy of the part. Formlabs points out that it carries gates for a steady metal flow, vents for escaping gas, and extra size because metal shrinks as it cools. Add draft to vertical faces so the pattern pulls cleanly out of the sand.
Lost PLA and investment casting
For investment casting, the pattern is coated in a heat-resistant investment and burned out in a kiln, leaving a cavity for the metal. Polymaker’s PolyCast, a PVB filament made for this, leaves 0.003% ash and can be smoothed with isopropyl alcohol, a finish that carries over to the metal.
For fine detail such as jewelry, Formlabs lists castable resins including Clear Cast and Castable Wax. Molten metal and kiln fumes are serious hazards, so learn the process with experienced casters and proper protective gear.
3D printed injection molds for short runs
3D printed injection molds are mold inserts printed in heat-resistant resin and fitted into a metal frame on an injection molding machine. Formlabs says fully dense, isotropic SLA prints give molds at a quality not possible with FDM.
- Materials: Rigid 10K Resin is Formlabs’ go-to mold material, with High Temp Resin for higher injection temperatures (see the heat table above).
- Plastics: Formlabs lists PP, PE, TPE, TPU, POM and PA. Low viscosity plastics reduce pressure and extend mold life.
- Design rules: two or three degrees of draft, uniform walls, large air vents, and no surfaces thinner than 1–2 mm, which may deform with heat.
- Mold life: Braskem ran 1,500 injection cycles with one High Temp Resin insert, but Formlabs also warns that this resin is brittle and some intricate molds struggle to pass a dozen cycles.
A printed insert is a bridge, not a replacement for steel: it tests a part in its production plastic before you pay for machined tooling.
3D printing vs injection molding: when each one fits
3D printing wins when you need few parts or expect design changes, and injection molding wins once the volume justifies a mold. Formlabs explains that injection molding has a large fixed start-up cost for the mold but low variable costs, thanks to cheap thermoplastics, short cycle times and automation. Its worked example shows how the mold and lead time change with volume:
| Production volume | Mold type in the example | Lead time to final parts |
|---|---|---|
| 100 parts | 3D printed polymer mold, molded in-house | 1–3 days |
| 5,000 parts | Machined aluminum mold, outsourced | 3–4 weeks |
| 100,000 parts | Machined steel mold, outsourced | 4–8 weeks |
- A handful of parts: print them directly.
- A production plastic such as PP: mold it, starting with a printed insert.
- A design still changing: a print can be revised overnight; a cut steel mold cannot.
If you design your own parts, our guide on how to make 3D models for printing covers CAD basics such as wall thickness and measuring for fit. Costume builders use molds too; our guide to 3D printed cosplay armor covers large wearable prints.
The bottom line
3D printed molds cover five routes: silicone molds from printed masters, direct printed molds, sand casting patterns, lost PLA patterns and short-run injection mold inserts. For most makers, a sealed printed master in a printed mold box, cast in silicone, gives the best surface and the widest choice of casting materials. Respect your print material’s heat limit, fully cure resin masters before pouring platinum silicone, and never use a printed part as a food mold.
Sources
- Smooth-On: Molding UV resin 3D prints, Mold Star 20T, EpoxAmite HT and food safe mold making (cure inhibition, UV post cure, sealers, cure time, 232 °C rating, exotherm, food-grade silicones)
- Formlabs: 3D printing for injection molding, injection molding cost, casting silicone and metal casting (resin heat deflection, design rules, mold life, lead times, silicone techniques, patterns)
- Prusa Research: Mold making and casting guide, material table, PLA guide and Prusament ASA (mold box, pour channel, cure and set times, casts per mold; PLA 55 °C, PETG 68 °C and ASA 93 °C at 0.45 MPa; food contact)
- Polymaker Wiki: PolyCast (PVB) (investment casting filament, 0.003% ash, alcohol smoothing)